CC PrestaShop Banner Documentation
Comprehensive documentation for banner management module for PrestaShop (cc_ps_banner) with rich configuration options and ready-made templates.Table of contents
- Introduction
- Installation
- License activation
- Management panel
- Banner management
- Background configuration
- Video configuration
- Content presets
- Overlay configuration
- Animation settings
- Display schedule
- Using the module in templates
- Troubleshooting
- FAQ
1. introduction
CC PrestaShop Banner to zaawansowany moduł do tworzenia i zarządzania banerami w sklepach PrestaShop. Moduł oferuje intuicyjny interfejs, który umożliwia tworzenie atrakcyjnych banerów za pomocą gotowych szablonów, bez konieczności
znajomości HTML i CSS.The module offers:
- Nine ready-made banner content presets
- Different types of background: video, photo or color
- Integration with YouTube, Vimeo and the ability to upload your own videos
- Color or graphic overlays (overlay)
- Input animation effects
- Display schedule (from-to)
- Possibility to place the banner in different areas of the store
- Support for multiple banners simultaneously
2 Installation
System requirements
- PrestaShop 1.7 or later
- PHP 7.0 or later
- Permission to install modules
- Download the ZIP file of the module from the official store cocos.codes
- Log in to your PrestaShop admin panel
- Go to: Modules > Module Manager > Add New Module
- Click "Add Module" and select the downloaded ZIP file
- When the installation is complete, click "Configure"
Info
After installation, the module will automatically create the necessary tables in the database. It will be necessary to configure the module and activate the license before full use of all functions.
3. license activation
It is necessary to activate the license before using the full functionality of the module:
- After installation, go to configure the module
- Select the "License" tab
- Enter the license key you received after purchase
- Click "Activate License"
- After successful activation, you will see a confirmation message and all functions of the module will be unlocked
Warning
Without an active license, the module will operate in limited mode, without all advanced features. A message about the inactive license will be displayed at the top of the administration panel.
4. management panel
The module's management panel consists of several tabs that allow full configuration:Main tabs:
- Banner management - adding, editing and deleting banners
- Documentation - link to online documentation
- Support - link to support page
- Plugins - additional extensions for the module
- License - module license management
When you go to the "Manage Banner" tab, you will see a list of all created banners with the ability to edit, delete and change their activity status.
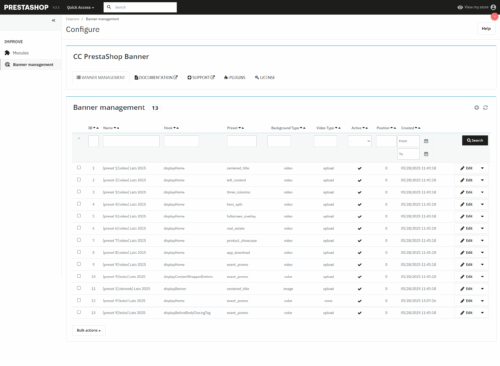
5. banner management
In the "Banner Management" tab you can create, edit and delete banners:List of banners
- Banner ID
- Name
- Hook (display location)
- Preset (content template)
- Background type
- Video type
- Activity status
- Position
- Date of creation
- Available actions (edit, delete)
- Click the "Add New" or "Edit" button next to an existing banner
-
Fill out the banner data form, which is divided into sections:
- Basic data - name, activity status
- Displaying - hook, dimensions, corner rounding, position
- Background type - selection of background type (video, photo, color)
- Video configuration - video player settings
- Content Preset - selection of a ready-made template and its configuration
- Overlay - overlay layer configuration
- Animations - banner entry effects
- Display schedule - setting the banner activity time
- Click "Save" to save the changes
Tip
A good practice is to give banners descriptive names that make them easy to identify in the panel, such as "Spring promotion - homepage" or "Promotional banner - Black Friday."
6. background configuration
The module offers three different types of banner backgrounds:Color
- Select "Color" as the background type
- Use the color selector to choose the appropriate background color
- You can enter the color value in HEX (#RRGGBB) or RGBA format
- Select "Photo" as the background type
- Upload an image using the "Browse" button
- Supported formats: JPG, PNG, GIF (maximum 15MB)
- When editing, uploading a new image will replace the current image, leaving the field blank will keep the existing image
- Select "Video" as the background type
- Configure the remaining video settings in the "Video Configuration" section (described in the next section)
Note
If you choose a video background, it's a good idea to also set a colored background as a backup layer when loading the video so the user doesn't see a blank element.
7. video configuration
The module allows you to use video as a banner background. Various video sources are available:Video types
- No video - used when a background type other than video is selected
- YouTube - embedding a video from YouTube
- Vimeo - embedding a video from Vimeo
- URL direct - link to a video file hosted on an external server
- Video file (upload) - uploading your own video file
- Automatic playback - starts playback automatically when the page loads
- Muted - Video played without sound (recommended for autoplay)
- Looping - automatic video replay when the video ends
- Show controls - Displays custom control buttons (play/pause, mute/on sound)
- Select the video type "Video file (upload)"
- Upload the file using the "Browse" button
- Supported formats: MP4, WebM, AVI, MOV (maximum 50MB).
Warning
Autoplay video with sound is blocked by most modern browsers. For best results, we recommend enabling the "Mute" option when autoplay is enabled.
8. content presets
The module offers nine ready-made content presets (templates) that can be selected and customized:Available presets
- No preset (video only) - displays the background alone without any additional content
- Preset 1 (Central title with button). - large central title, subtitle and CTA button
- Preset 2 (Left-aligned text) - content aligned to the left side of the banner
- Preset 3 (Three-column layout) - content divided into three columns
- Preset 4 (Split into two columns). - content divided into two columns
- Preset 5 (Full screen with blur) - full-screen effect with large central title
- Preset 6 (Header with statistics). - header at the top and three columns of data at the bottom
- Preset 7 (List of functions with CTA). - the title and the list of features ending with a CTA button
- Preset 8 (Header and two columns) - download application layout
- Preset 9 (Header and two columns centered, enlarged) - layout type "event promotion"
- Main Title - main banner header
- Subtitle - supplementary text under the main title
- Button text - content displayed on the CTA button
- Button link - Destination URL when the button is clicked
- Button text color - button font color
- Button background color - button background color
- Text 1, 2, 3 - additional text fields used in various presets
- Custom CSS - additional CSS styles for the banner
Tip
Text fields support HTML formatting, which allows you to add bold, italics, text colors and other effects. You can also add icons and emoji to make the content more attractive.
9. overlay configuration
An overlay is a layer displayed over a banner background that can help make text more readable or create a smoky effect:Overlay types
- No overlay - no additional layer over the background
- Color - colored layer with adjustable transparency
- Image - Graphic overlay (e.g., gradient, pattern, texture)
- Color of the overlay - color selection with a selector (supports HEX and RGBA formats)
- Transparency - value from 0.0 (completely transparent) to 1.0 (opaque)
- Overlay image - uploading an image using the "Browse" button
- Transparency - adjusting the intensity of the imaging overlay
Tip
A dark overlay with a transparency of 0.3-0.6 over a photo or video greatly improves the readability of white text. For light text on a light background, we recommend using a darker overlay.
10. animation settings
The module offers several animation effects that are applied when the banner is loaded:Entry animation
- Without animation - banner appears immediately
- Smooth appearance - The banner gradually becomes visible (fade-in effect)
- Entry from the left - banner enters from the left side of the screen
- Entrance from the right - banner enters from the right side of the screen
- Entrance from below - banner enters from the bottom of the screen
- Augmentation - The banner appears with a zoom effect from the center
- Bounce - banner appears with a bounce effect
- Value in milliseconds (from 100 to 10000)
- Default value is 1000ms (1 second)
- Shorter time = faster animation
- Longer time = slower, smoother animation
Note
Animations are implemented using CSS, which ensures smooth operation even on mobile devices. If the animation does not run smoothly on older devices, we recommend shortening the animation time or choosing a simpler effect.
11. display schedule
The schedule function allows banners to be automatically turned on and off at a specific time:Schedule settings
- Enable schedule - activation of timed display function
- Start date - date and time from when the banner is to be displayed
- Completion date - date and time until when the banner is to be displayed
- Time-limited promotional banners (e.g. Black Friday, seasonal sales)
- Information about upcoming events
- Change banners according to the time of day (different banners in the morning, different in the evening)
- Periodic announcements to customers
Info
The scheduler works based on the server's time, not the user's local time. Make sure the server time zone is configured correctly in PrestaShop settings.
12. use of module in templates
Banners are automatically displayed in the locations specified by the selected hooks. Available hookups include:Main locations
- displayHome - main content of the homepage
- displayTop - The top section of the page (above the header)
- displayNav1 - The first navigation bar (above the logo/store)
- displayNav2 - second navigation bar (often under the logo)
- displayNavFullWidth - Full-width navigation (e.g., megadropdown menus)
- displayBanner - banner ad above the header
- displayFooter - main content of the footer
- displayFooterBefore - The section before the footer (e.g., additional links)
- displayFooterAfter - The section after the footer (e.g., disclaimers, scripts)
- displayLeftColumn - left column of the website
- displayRightColumn - right column of the website
- displayWrapperTop - top of main page container
- displayWrapperBottom - bottom of the main page container
- displayContentWrapperTop - top of main content
- displayContentWrapperBottom - lower part of the main content
- displayBeforeBodyClosingTag - immediately before closing the tag <body> (often for scripts)
- displayProductAdditionalInfo - additional information on the product page
- displayProductListReviews - product reviews in the list view (e.g. stars)
- displayReassurance - block with guarantees/trust
- displayAfterProductThumbs - items after thumbnail images of the product
- displayShoppingCart - content on the shopping cart page
- displayShoppingCartFooter - additions in the footer of the shopping cart (e.g., CTA buttons)
- displayBeforeCarrier - section before choosing a delivery method
- displayAfterCarrier - section after choosing the delivery method
- displayOrderConfirmation - confirmation of order
- displayCustomerAccount - Customer account content (e.g. links, modules)
- displayMyAccountBlock - "My Account" block (usually in the header or side column)
Tip
For best results, we recommend adjusting the width and height of the banner according to where it is to be displayed. For example, banners in side columns should be narrower than banners on the main page.
13 Troubleshooting
Banner does not display
- Check if the banner is active ("Active" status in the banner list)
- Make sure the license is active
- Check that the hook to which the banner is assigned is present in the current template
- If the schedule is enabled, make sure the current date is within its range
- Clear PrestaShop and browser cache
- Make sure the "Auto play" option is enabled
- Check if the video is muted (browsers block autoplay of video with sound)
- Check that the video URL is correct (for YouTube and Vimeo)
- Verify that the video file has been uploaded correctly (for your own file)
- Adjust the dimensions of the banner so that it is responsive (e.g. width: 100%).
- Reduce the size of the uploaded video or photo for better performance
- Adjust the amount of text - on small screens, too much text can be unreadable
Error
If you encounter unsolvable problems with the module, please make sure you are using the latest version and that your PrestaShop store is up to date. In case of difficulties, contact COCOS support via the following page.
cocos.codes/support.
14 FAQS.
Can I have more than one banner in the same place (hookup)?Yes, the module allows you to assign multiple banners to the same hookup. The banners will be displayed according to the set position (from the lowest to the highest value).
Can I use the same banner in different areas of the store?
Currently, one banner can only be assigned to one hookah. If you want to display the same banner in different places, you need to create a copy of it and assign it to another hookah.
How big video files can I upload?
The module allows you to upload video files with a maximum size of 50MB. For optimal performance, however, we recommend compressing the video to the minimum necessary and using the MP4 format with the H.264 codec.
Are the banners responsive?
Tak, banery dostosowują się do szerokości kontenera, w którym są wyświetlane. Aby zapewnić pełną responsywność, zalecamy ustawienie szerokości na 100% oraz odpowiedniej wysokości (możesz użyć jednostek vh dla wysokości zależnej od wysokości ekranu).
Can I embed the form in a banner?
Moduł w standardowej wersji nie obsługuje bezpośrednio formularzy. Jeśli potrzebujesz umieścić formularz w banerze, możesz użyć niestandardowego kodu HTML w polach tekstowych, ale funkcjonalność formularza będzie zależeć od szablonu Twojego sklepu.
How often is the module updated?
The module is regularly updated to ensure compatibility with the latest versions of PrestaShop and to introduce new features. Holders of a valid license have access to all updates.
Can I transfer the license to another store?
The license is assigned to one domain. If you change your store's domain, please contact COCOS support to transfer the license.
Does the module affect the performance of the store?
The module has been optimized for performance. The biggest impact on loading speed may be large video files or images. We recommend optimizing media files before using them in banners.