How to easily integrate your WooCommerce store with OLX - step-by-step guide
The first step is to get access to the OLX API. Here's how to do it:
Now it's time to install and activate the CC WordPress OLX Integration plugin:
After installing the plug-in, it is necessary to activate the license:
Now you need to configure the plugin's connection to the OLX API:
Now you can configure default values for ads. To do this, go to OLX INTEGRATION > SETTINGS > DEFAULT VALUES FOR NOTICES:
Now you can publish your WooCommerce products on OLX:
Managing published announcements is easy: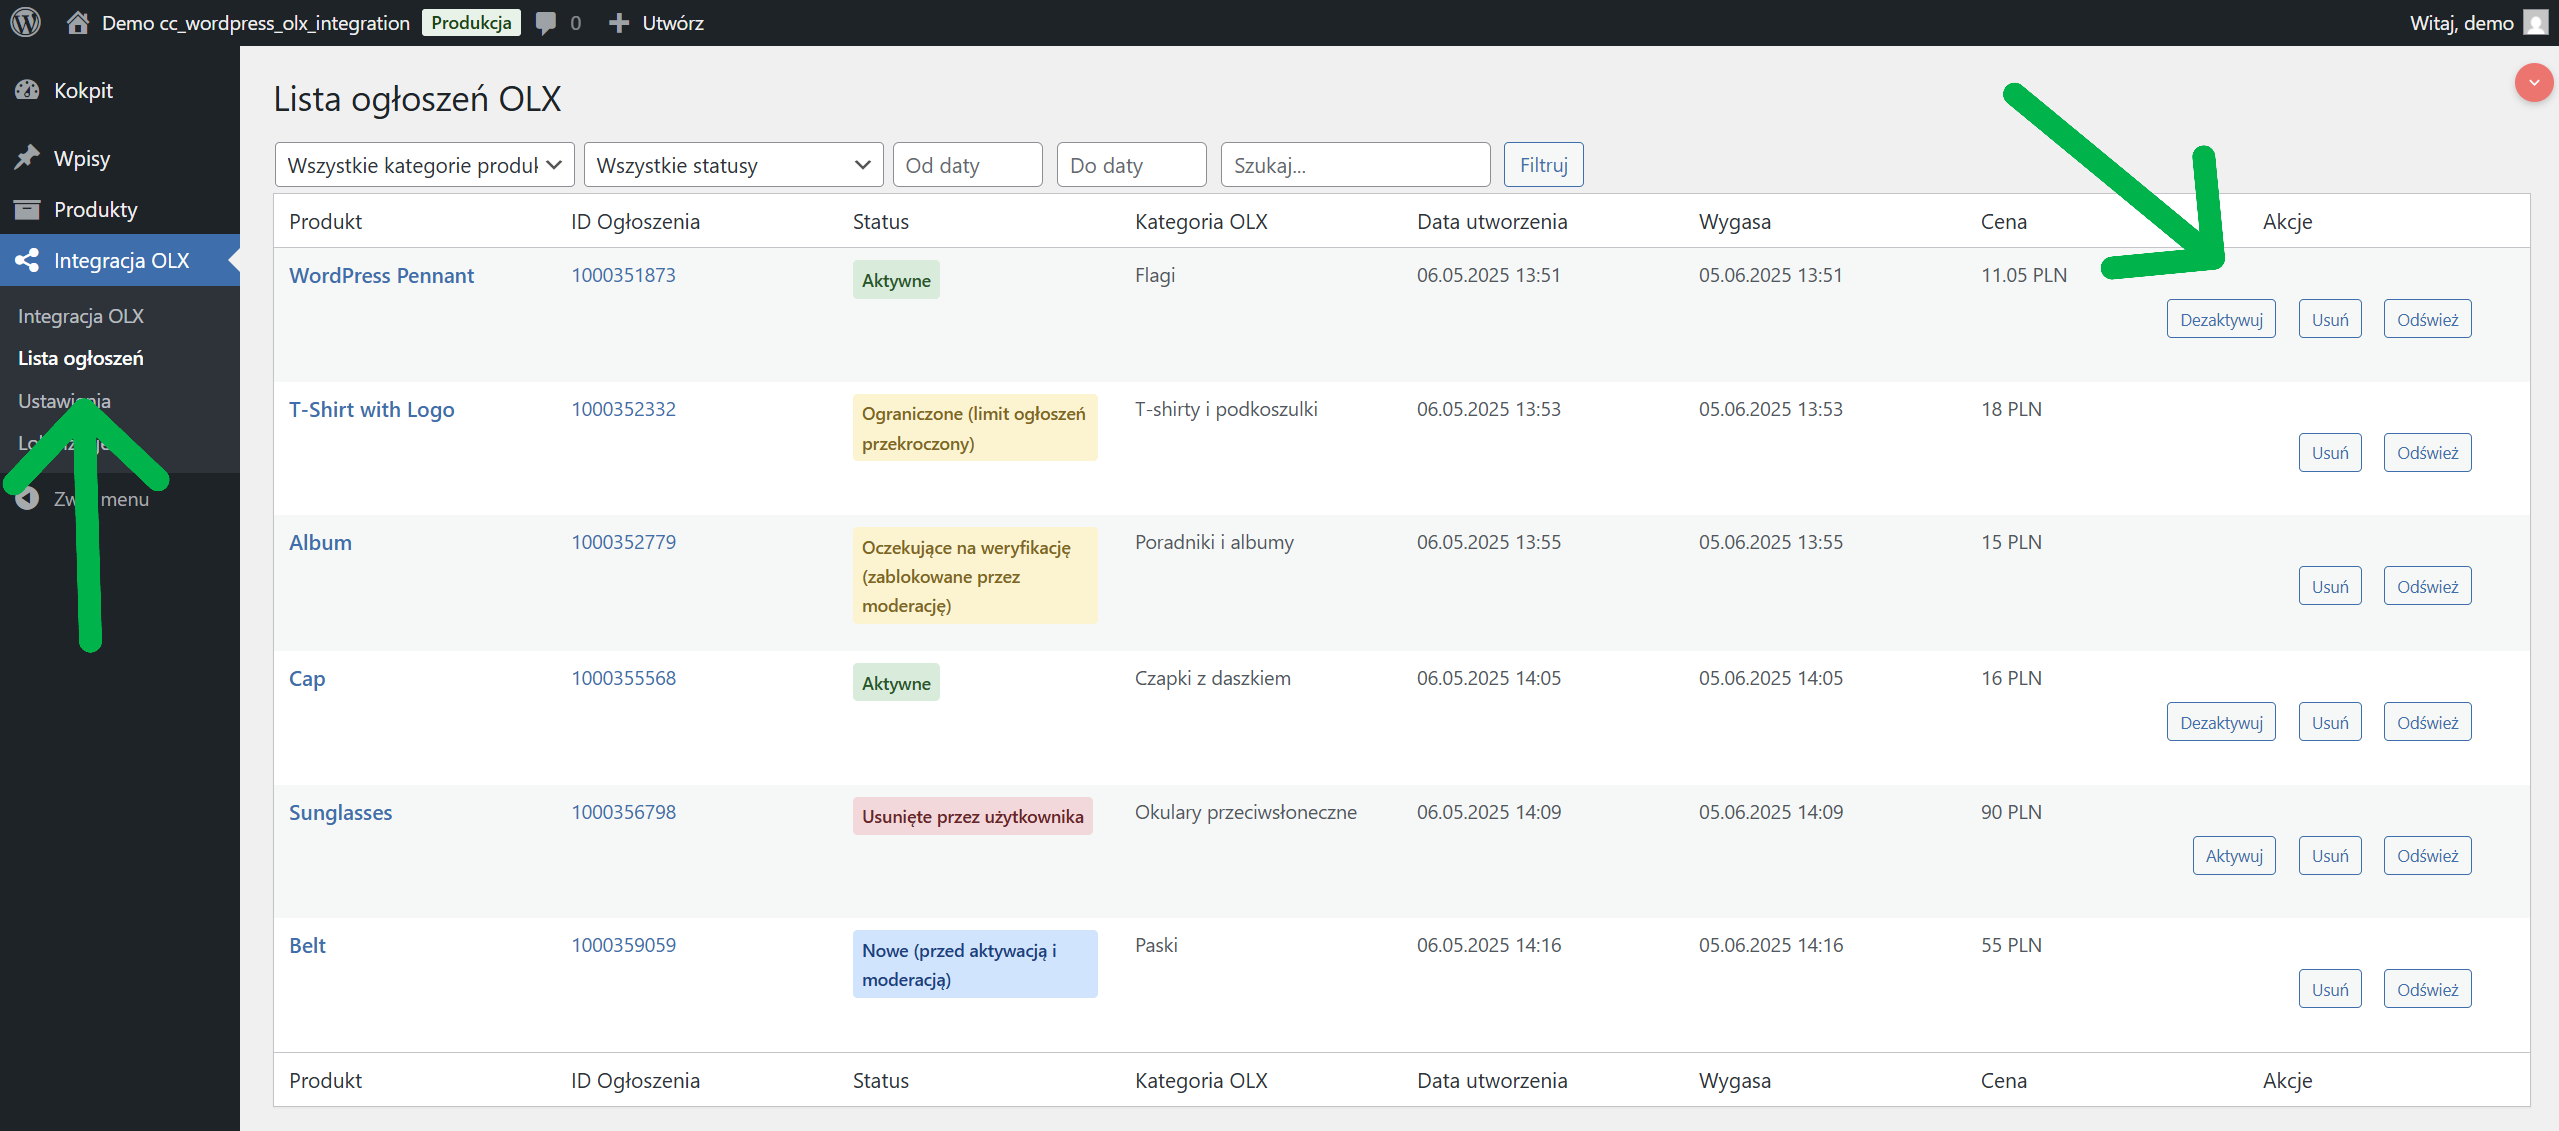
Problem: The ad is not publishing on OLX
Integration of WooCommerce store with OLX platform using a plugin. CC WordPress OLX Integration is a simple way to increase your reach and sales. By automating the publishing of ads, you will save time and reach new customers using OLX.
The plugin offers many features such as ad management, location synchronization and custom settings to help you effectively manage your OLX sales directly from your WordPress dashboard.
Are you already using the integration of your store with OLX? What are your experiences? Share your thoughts in the comments!
Introduction
Are you running a WooCommerce store and wondering how to increase sales? Publishing ads on OLX is a great way to reach new customers. However, manually adding each product is time-consuming. Fortunately, there is a solution - a plugin CC WordPress OLX Integration. In this article, we will show you how to integrate your WooCommerce store with OLX in a few easy steps, save time and increase sales.Info
CC WordPress OLX Integration plugin Requires an active WooCommerce store and an account on the OLX platform with API access.
Why integrate your store with OLX?
- You will reach millions of potential customers using OLX
- Save time - publish products directly from your WordPress dashboard
- Automate your ad management
- You will gain an additional sales channel
- Increase the visibility of your products
Step 1: Get access to the OLX API
The first step is to get access to the OLX API. Here's how to do it:- Go to page developer.olx.pl
- Go to LOG IN (you must have an account at OLX.PL), then MY OLX API > ACCOUNT and fill in the missing data.
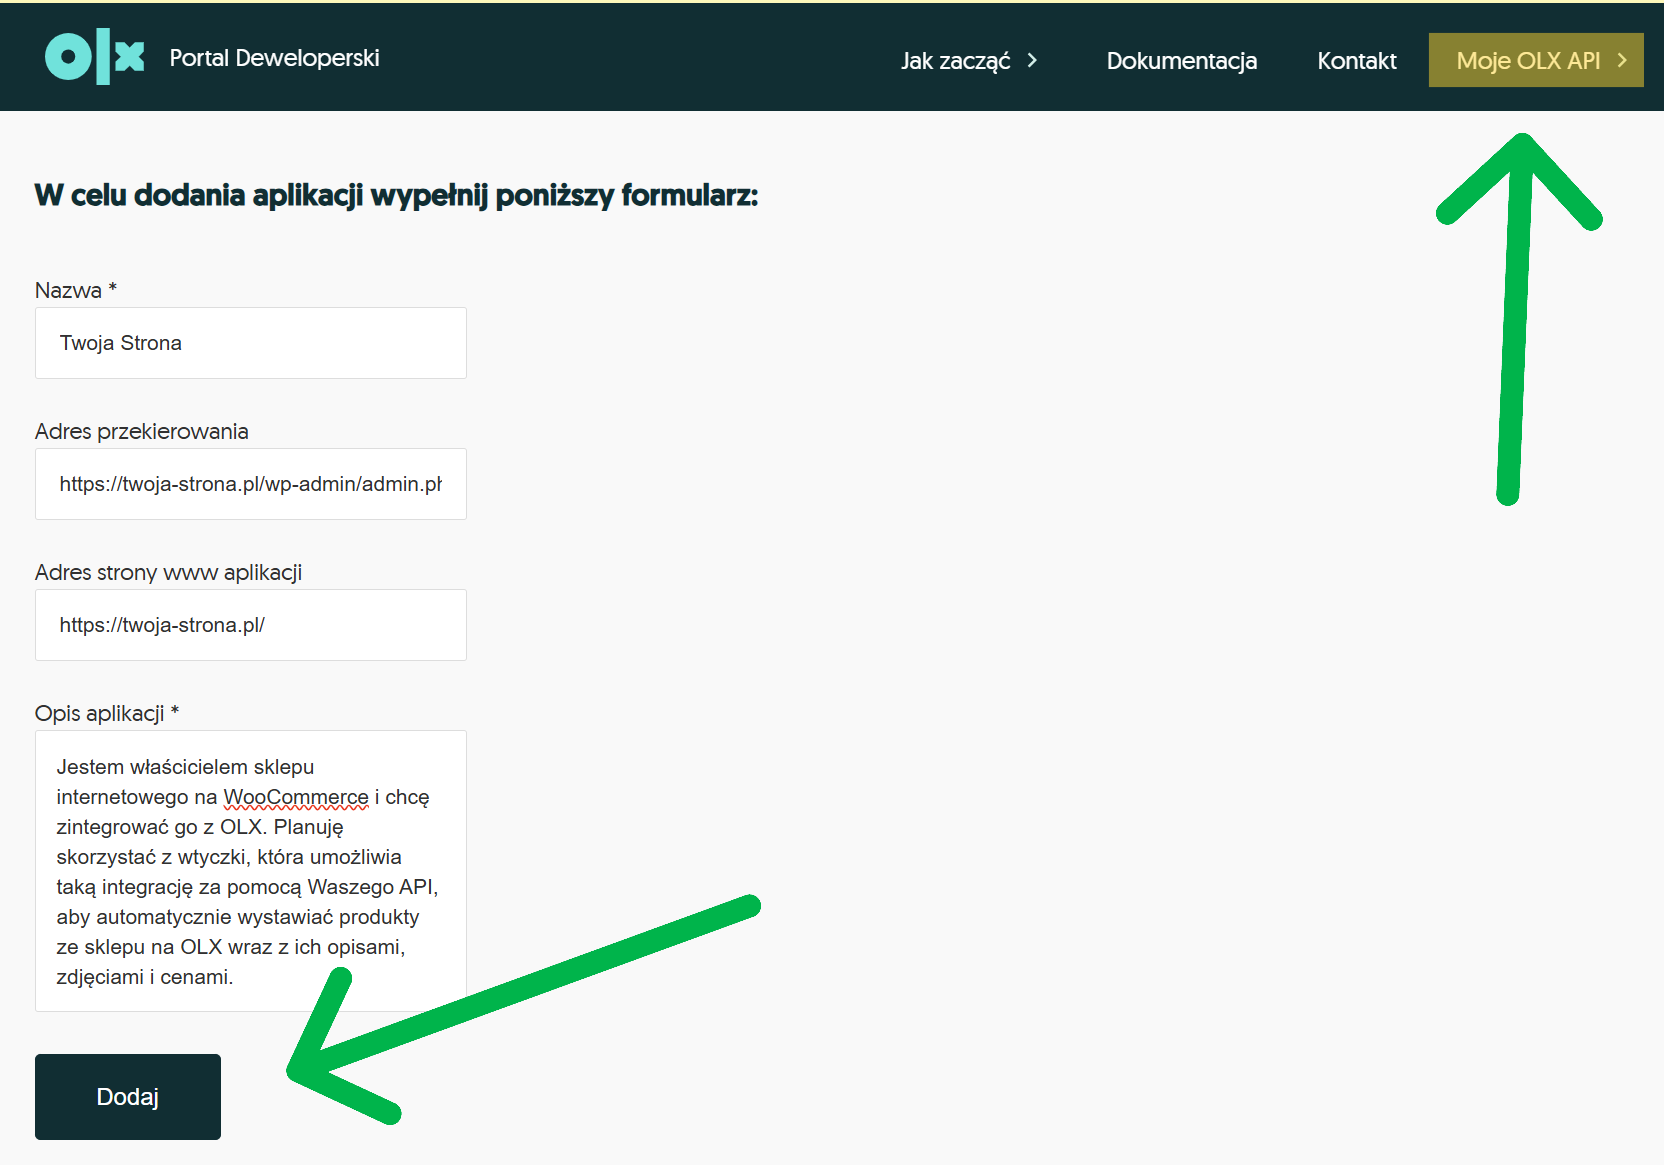
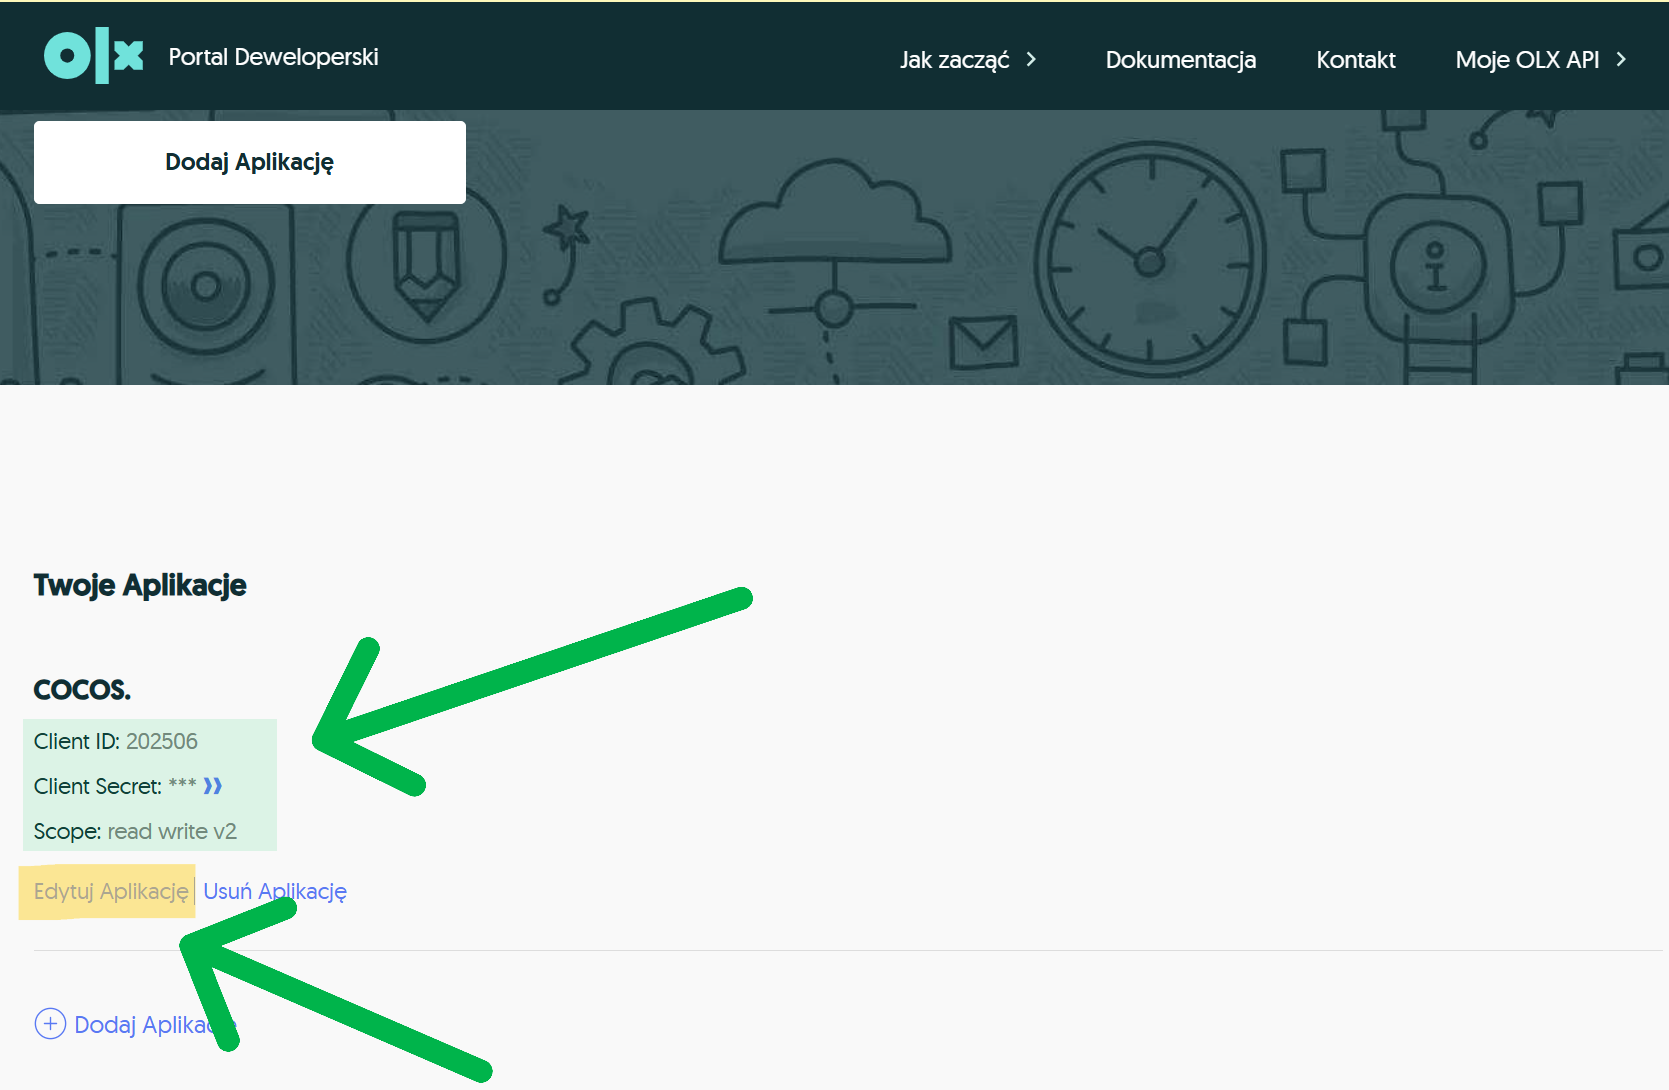
- Then go to MY OLX API > YOUR APPLICATIONS > ADD APPLICATION.
- Fill out the API access request form with:
- Name e.g.. Your Site
- Redirection address, e.g. https://twoja-strona.pl/wp-admin/admin.php?page=cc-olx-settings
- Website address of the application, e.g. https://twoja-strona.pl/
- Description of the application, e.g. I own an online store on WooCommerce and want to integrate it with OLX. I plan to use a plugin that allows such integration via your API to automatically list products from the store on OLX with their descriptions, photos and prices.
- Wait for a response from the OLX team (usually 2-5 business days)
Warning
Make sure that Callback URL (redirect address) is exactly the same as the address you later enter in the plugin settings. Otherwise, the authorization will not work properly.
Tip
In the application form, describe exactly for what purpose you want to use the OLX API. The more precise the description, the better the chance of quick approval.
Step 2: Install and activate the plugin
Now it's time to install and activate the CC WordPress OLX Integration plugin:- Download the ZIP file of the plug-in from the site cocos.codes
- Log in to your WordPress admin panel
- Go to: Plugins > Add New > Upload Plugin
- Select the downloaded ZIP file and click "Install Now".
- After installation, click "Enable plug-in"
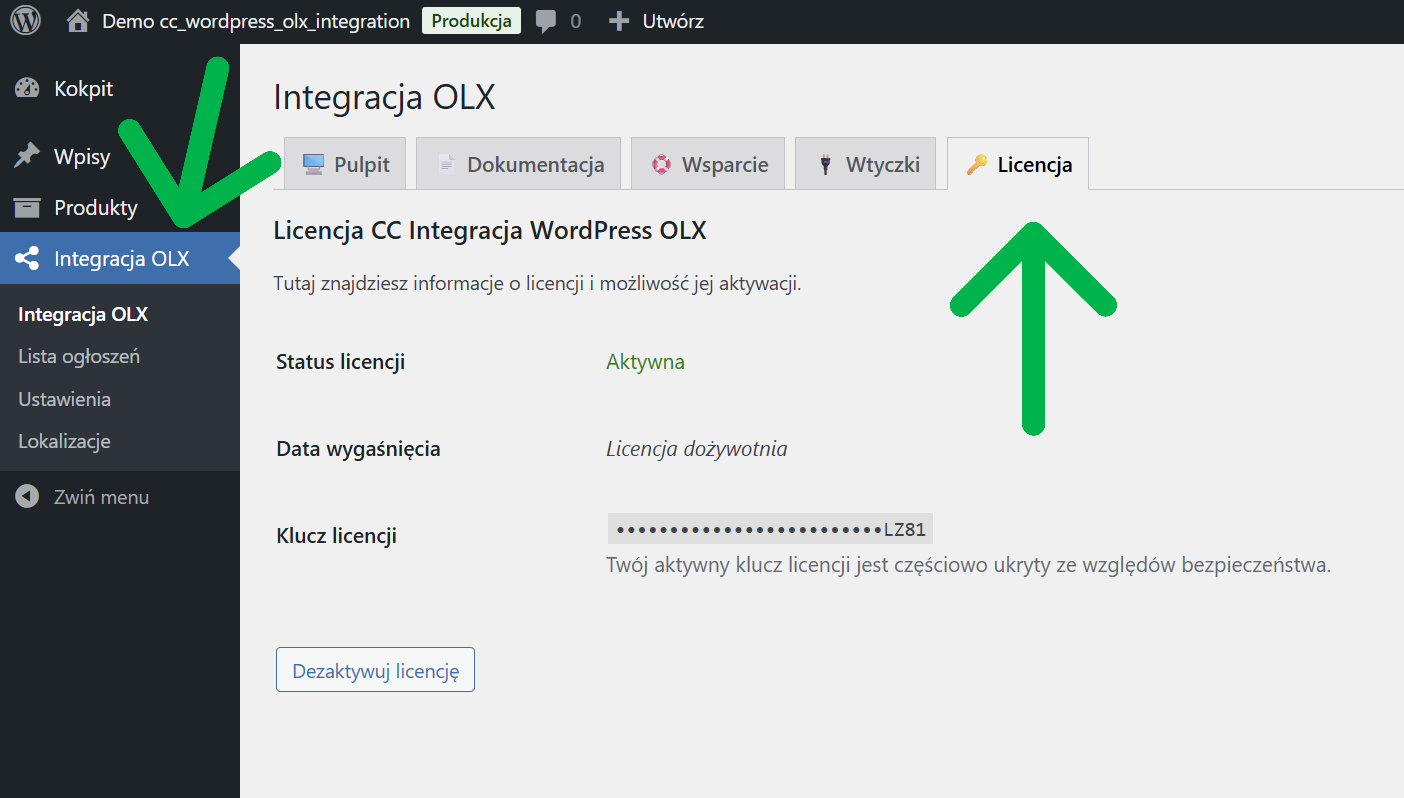
Step 3: Activate the license
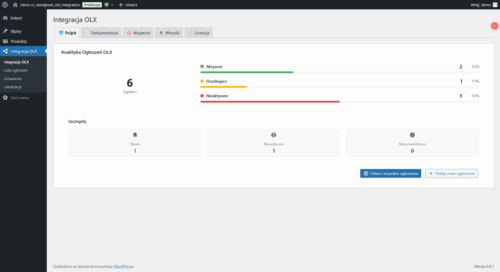
After installing the plug-in, it is necessary to activate the license:- In the side menu of your WordPress dashboard, you will see a new item called "OLX Integration."
- Go to: OLX Integration > License
- Enter the license key you received after purchasing the plug-in
- Click "Activate License"
Success
Once the license is activated correctly, you will see a confirmation message and all the plugin's features will be unlocked.
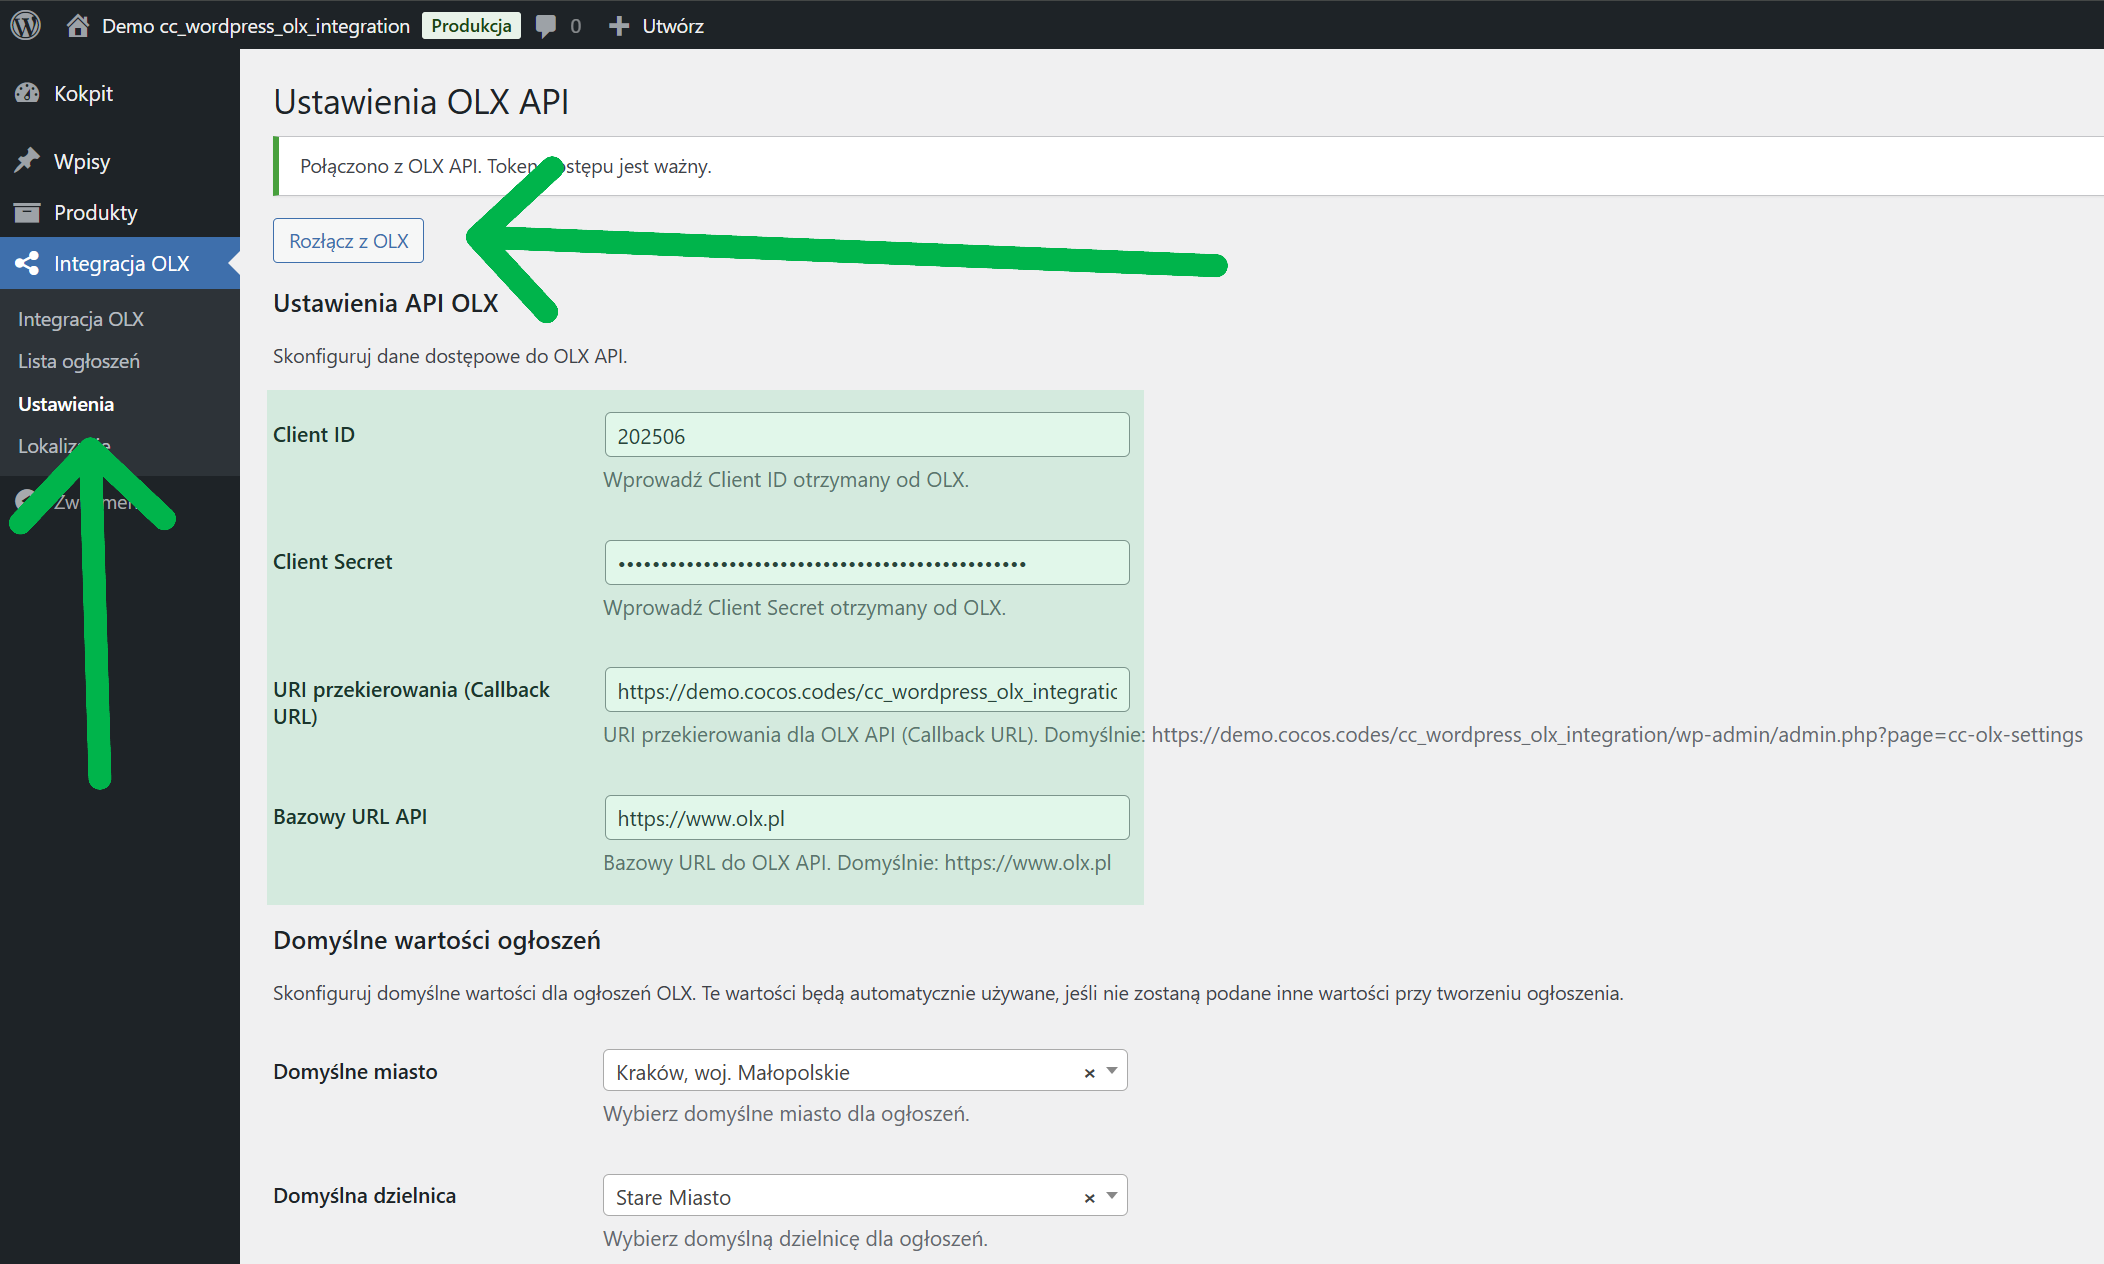
Step 4: Configure the connection to the OLX API
Now you need to configure the plugin's connection to the OLX API:- Go to: OLX Integration > Settings
- Enter the received API data:
- Client ID: paste the customer ID received from OLX
- Client Secret: paste the secret customer key received from OLX
- Redirection URI: should be automatically filled in (check if it agrees with what you entered in the OLX panel).
- Base API URL: defaults to https://www.olx.pl
- Click "Save Changes."
- After saving, a button "Connect to OLX" will appear - click it
- You will be redirected to the OLX login page, log in to your account
- Confirm application authorization
- After successful authorization, you will be redirected back to the WordPress dashboard
Note
The authorization process creates an access token that is valid for a certain period of time. The plug-in automatically renews this token, so you don't have to worry about reconnecting unless there is an apparent connection error.
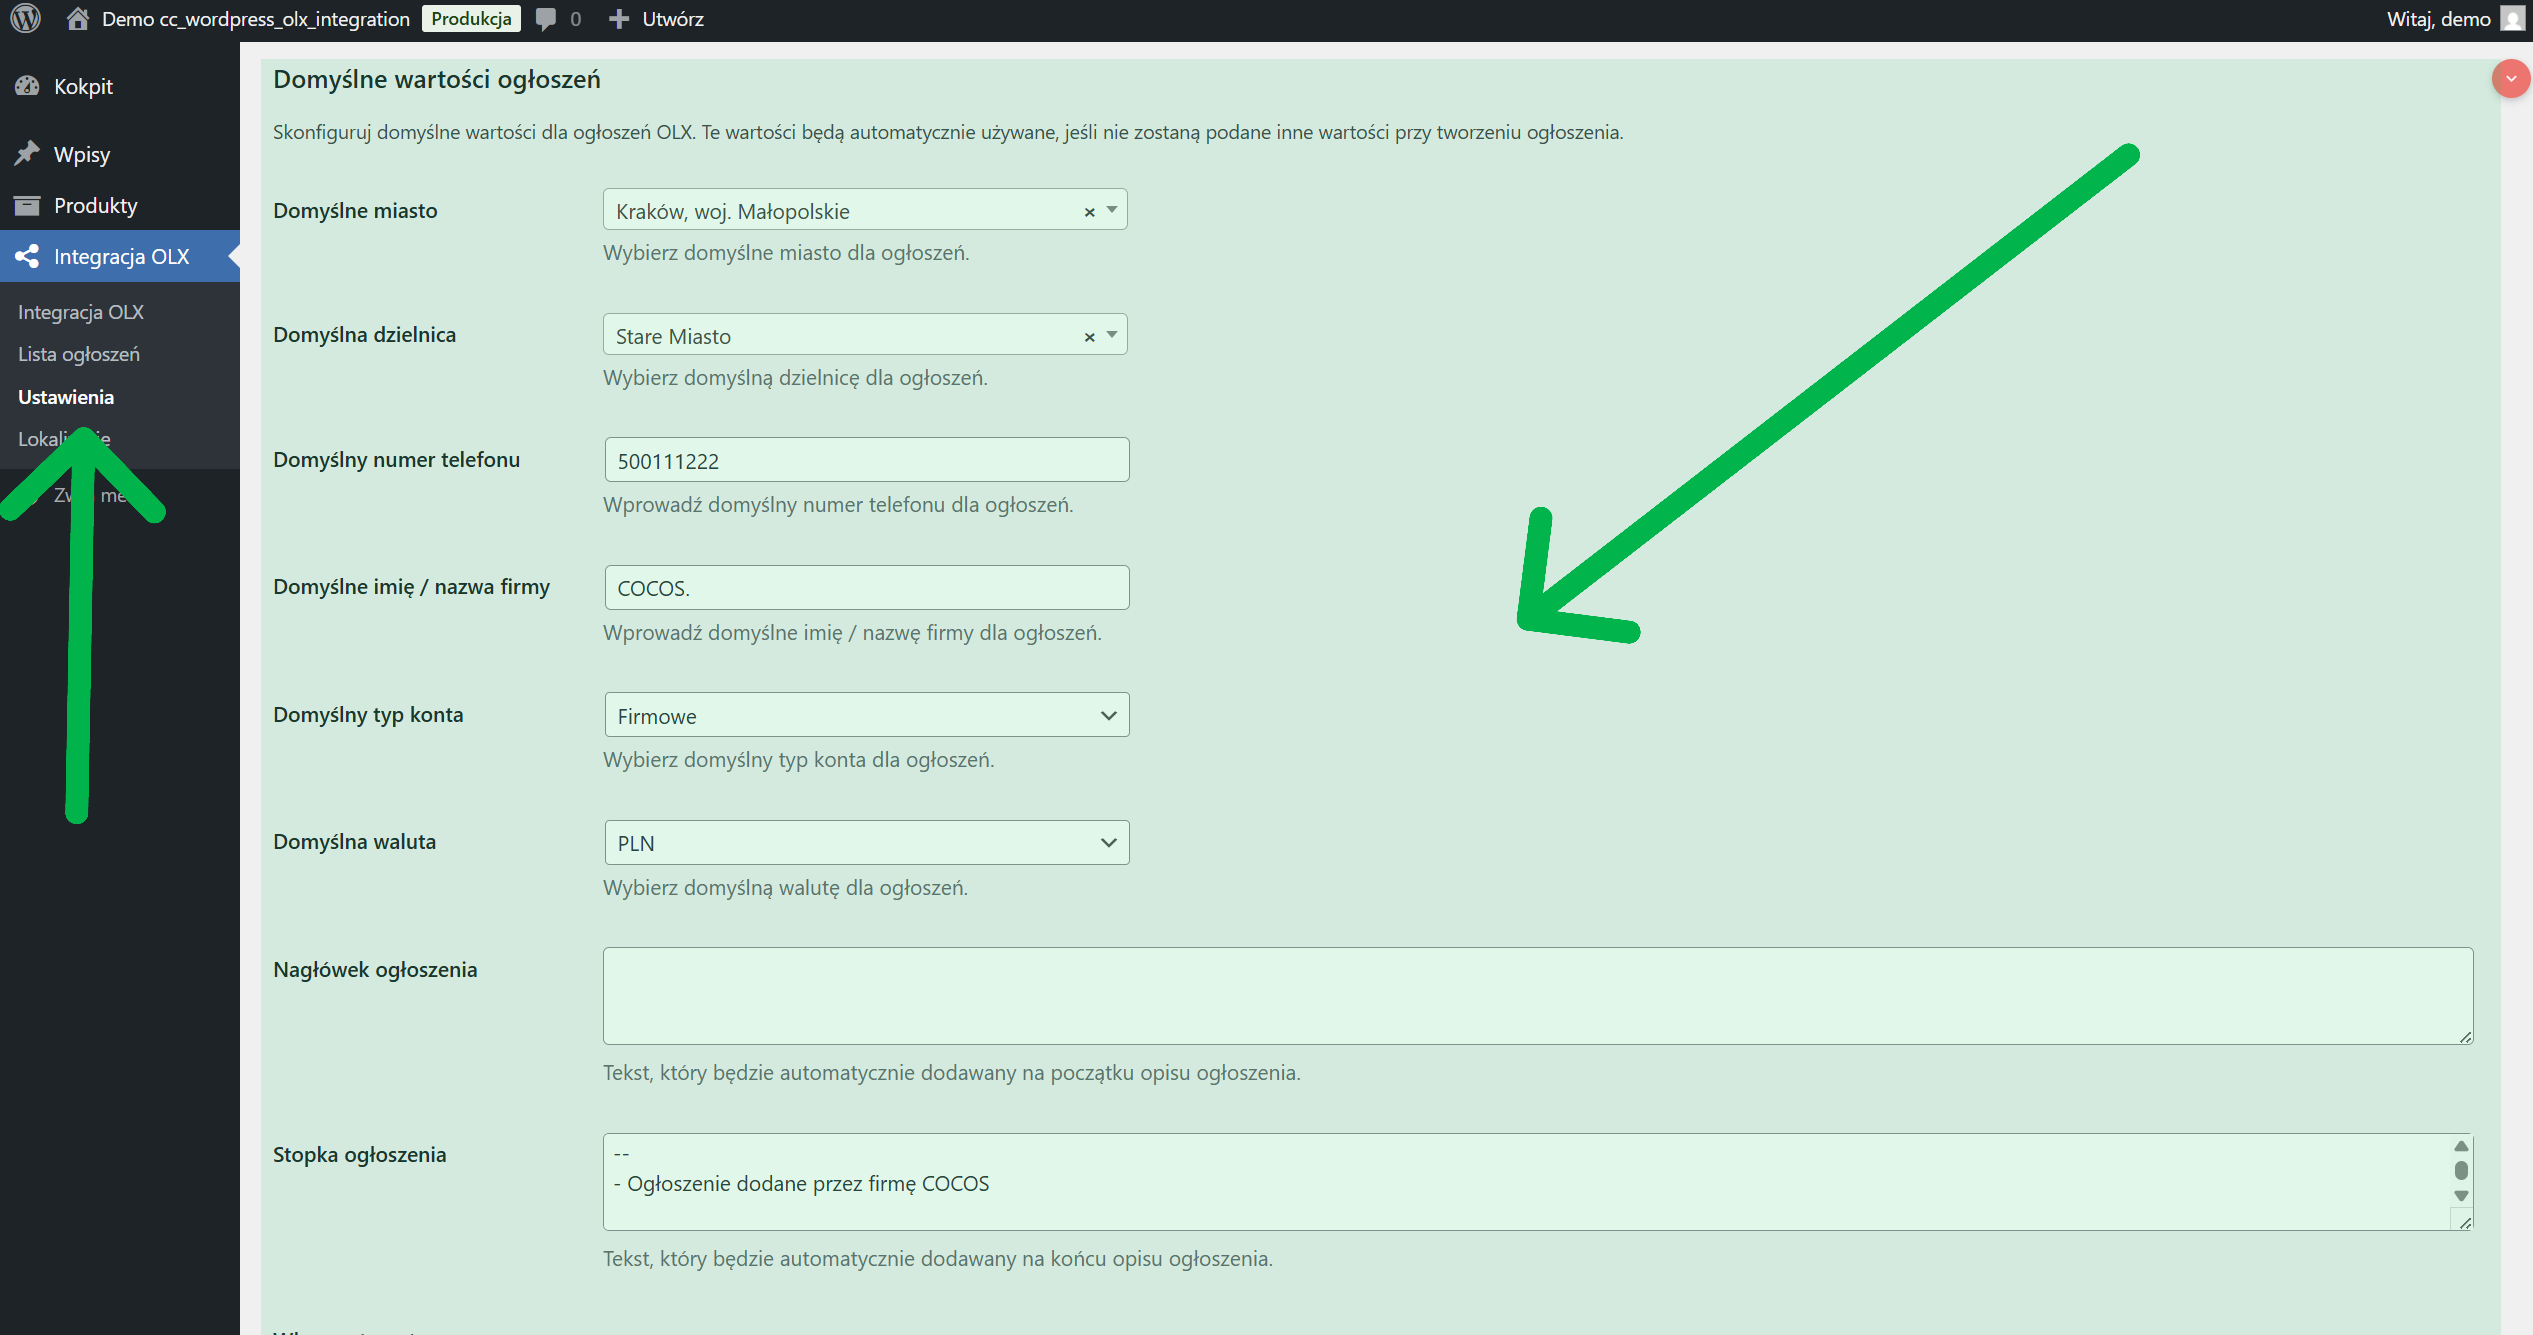
Step 5: Configure the default settings
Now you can configure default values for ads. To do this, go to OLX INTEGRATION > SETTINGS > DEFAULT VALUES FOR NOTICES:- In the "Default ad values" section, set:
- Default city: select the city from which you are shipping products
- Default district (optional)
- Default phone number: enter contact number
- Default name / company name: enter a name to be shown in the ads
- Default account type: select "Private" or "Corporate" (recommended for stores).
- Default currency: select the currency (default is PLN)
- You can also set up automatic headers and footers for your ad descriptions:
- Headline of the ad: text added at the beginning of each description
- Advertisement footer: text added at the end of each description (e.g., delivery information, warranty).
- Check the "Enable automatic header/footer" option to use these elements
- Click "Save Changes."
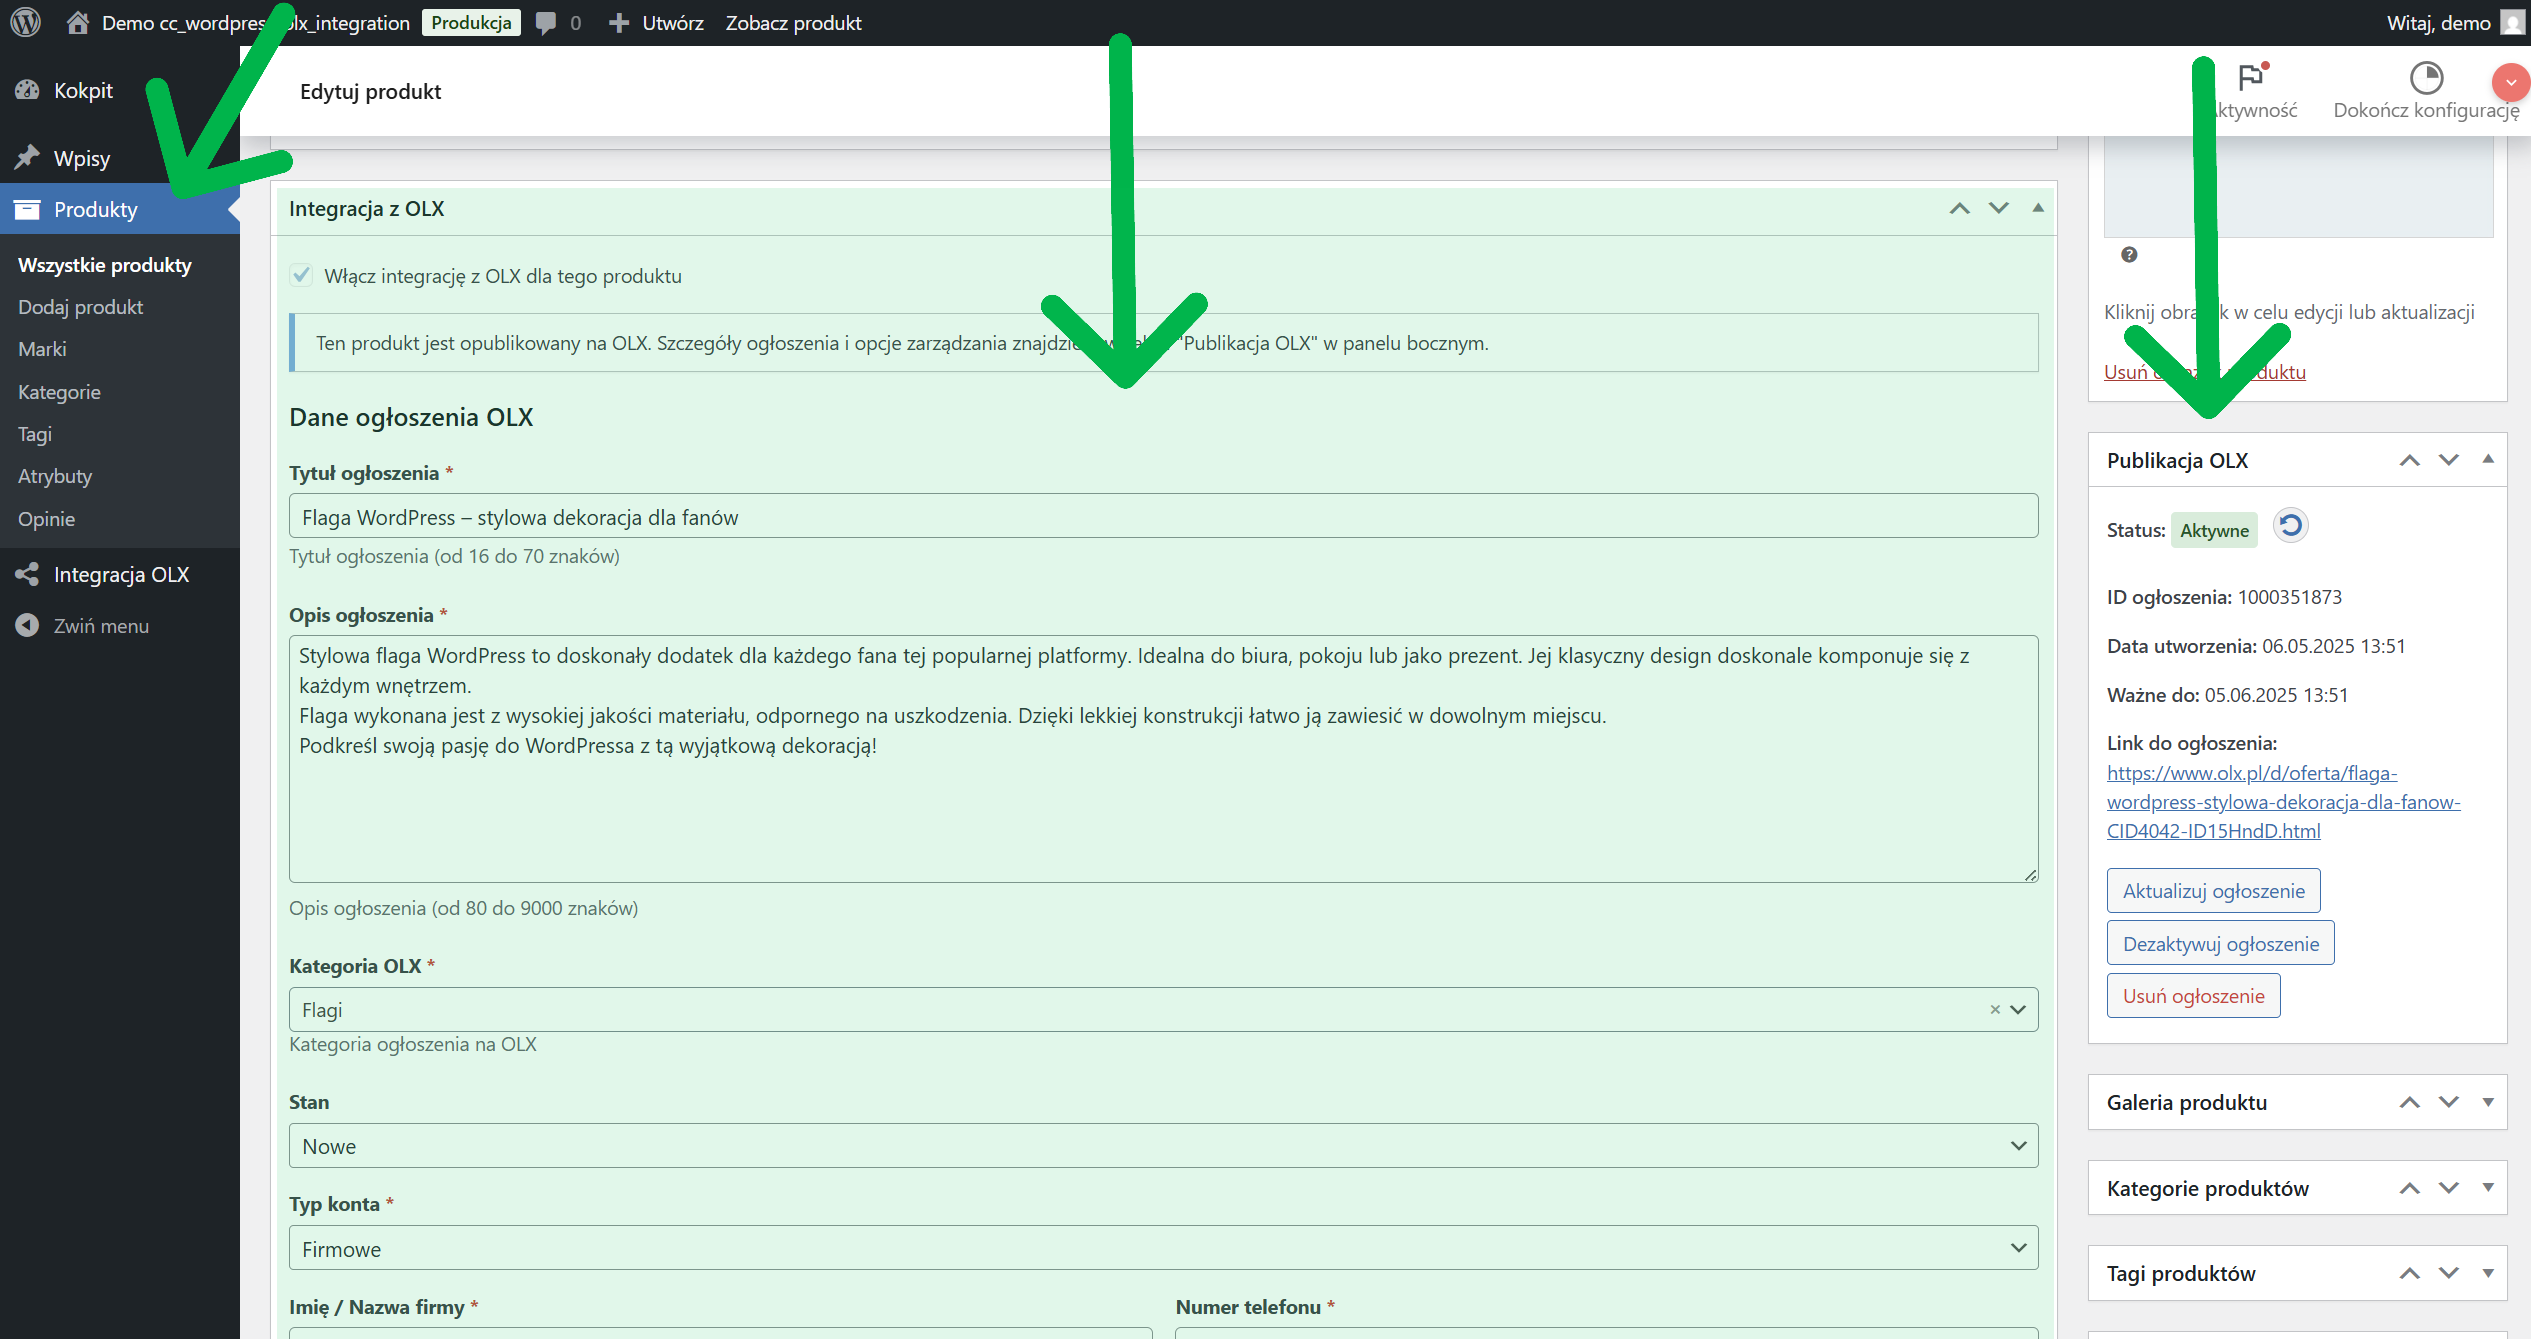
Step 6: Publish products on OLX
Now you can publish your WooCommerce products on OLX:- Go to: Products > Edit (select the product you want to publish)
- Scroll down to the "Integration with OLX" section.
- Check the option "Enable OLX integration for this product".
- Fill out the ad data form:
- Ad title: the same as the product name by default (16-70 characters required)
- Advertisement description: product description by default (80-9000 characters required).
- OLX category: select the appropriate category (must be the final category)
- Fill in additional fields specific to the selected category
- Check location settings, pricing and contact information
- Save the product
- In the "OLX Publishing" side panel, click the "Publish on OLX" button.
Tip
Photos of the product are automatically used in the OLX ad. The first 8 photos from the product gallery will be sent to OLX.
Step 7: Manage announcements
Managing published announcements is easy:- Go to: OLX integration > Ad listings
- Here you will find all your ads with different statuses
- Possible actions for announcements:
- Deactivate: temporarily disables ad
- Activate: restores announcement
- Delete: completely removes the ad from OLX
- Refresh: updates ad status
- Go to edit product
- In the side panel "OLX publication" you will find buttons:
- Update announcement: updates the content of the announcement after changes to the product
- Deactivate ad: for active announcements
- Activate ad: for inactive announcements
- Remove ad: removes ad from OLX
Solving common problems
Problem: The ad is not publishing on OLX- Check that the title and description meet the length requirements (title: 16-70 characters, description: 80-9000 characters)
- Make sure that the selected OLX category is the final category (without subcategories)
- Check that all required attributes for the selected category have been filled in
- Verify that the Client ID and Client Secret data are correct
- Make sure that the redirect URI in the plugin settings is the same as in the OLX panel
- Verify that your OLX account has permission to use the API
- Refresh the connection to OLX (disconnect and reconnect)
- Check that your account has access to all required categories
Error
If you see the message "No connection to OLX API", make sure that your access credentials are correct and that you have an active account on the OLX platform with API permissions.
Summary
Integration of WooCommerce store with OLX platform using a plugin. CC WordPress OLX Integration is a simple way to increase your reach and sales. By automating the publishing of ads, you will save time and reach new customers using OLX.The plugin offers many features such as ad management, location synchronization and custom settings to help you effectively manage your OLX sales directly from your WordPress dashboard.
Are you already using the integration of your store with OLX? What are your experiences? Share your thoughts in the comments!