PrestaShop Parcel Machines InPost Documentation
Comprehensive documentation for a module that enables integration PrestaShop with the InPost Paczkomaty system (cc_ps_paczkomaty).Table of contents
- Introduction
- Installation
- License activation
- InPost API configuration
- Sender settings
- Configuration of delivery methods
- Shipment management
- CRON automation
- Administration panel
- Troubleshooting
- FAQ
1. introduction
CC PS InPost Parcel Machines is a professional module for PrestaShop that allows full integration of an online store with the InPost Parcel Machines system. It allows automatic management of shipments, selection of parcel machines by customers and comprehensive support of the delivery process.The module provides full control over:
- Customer's choice of parcel machine when placing an order
- Automatic creation of shipments in the InPost system
- Generation and retrieval of shipping labels
- Track shipment statuses and automatically update order statuses
- Handling different types of deliveries (standard, COD, weekend)
- Managing InPost carriers in the system
2 Installation
System requirements- PrestaShop 1.7.0 - 9.99.99
- PHP 7.0 or later
- Support for cURL
- MySQL database access
- Download the ZIP file of the module from the official store cocos.codes
- Log in to your PrestaShop admin panel
- Go to: Modules > Module Manager
- Click "Upload Module" and select the downloaded ZIP file
- When the installation is complete, click "Configure"
Info
During installation, the module automatically creates the necessary tables in the database and InPost carriers in the system.
3. license activation
It is necessary to activate the license before using the module:- After installation, go to configure the module
- Select the "License" tab
- Enter the license key you received after purchase
- Click "Activate License"
- After successful activation, you will see a confirmation message
Warning
Without an active license, the module will operate in restricted mode, displaying warnings in the administration panel.
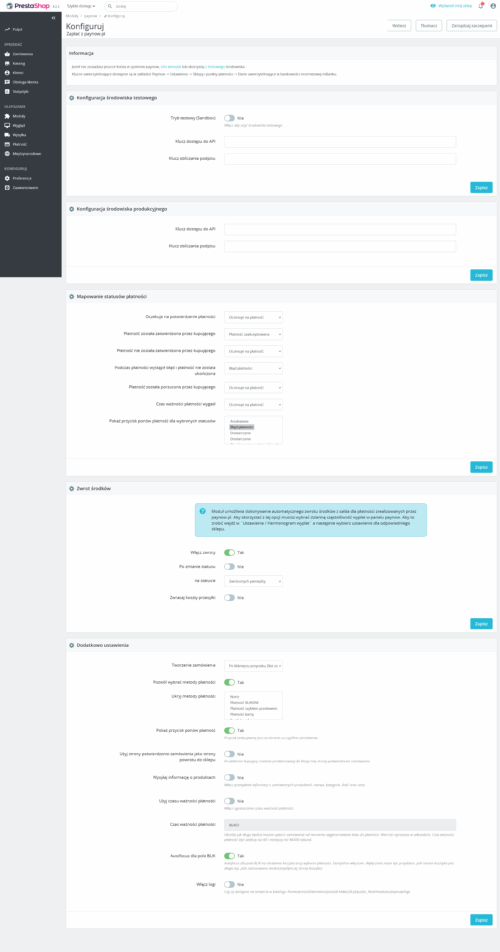
4 InPost API configuration
The first step after activating the license is to configure the connection to the InPost API:API access data
- Organization ID - organization identifier in the InPost system
- API Token - InPost ShipX API authorization token
- Geowidget Token - token to display parcel map
- Test mode (Sandbox) - enable for test environment
- Debug mode - detailed error messages for developers
Tip
You can get access data to the InPost API by contacting an InPost representative or by InPost partner panel.
5. sender settings
The configuration of the sender's data is crucial for the correct functioning of the module:Personal/company data
- Company - company name (optional)
- Name - data of the responsible person
- E-mail - sender's contact address
- Phone - contact number (9 digits without prefix)
- Street - street name
- House/location number - building number
- Zip code - in XX-XXX format
- City - sender's town
Error
All shipper data fields are required and must be filled in correctly before creating the first shipment.
6. configuration of delivery methods
The module automatically creates four types of InPost carriers:Available delivery methods
- InPost Parcel Machines - standard prepaid delivery
- InPost Parcel Machines COD - cash on delivery
- InPost Parcel Machines Weekend - prepaid weekend delivery
- InPost Parcel Machines Weekend COD - weekend cash on delivery
- Package size - small, medium, large
- Insurance - on/off
- Automatic switch-on - for weekend deliveries
- Weekend schedule - activation days and times
Note
Weekend deliveries can be configured to automatically activate on certain days of the week and times.
7. shipment management
The module provides comprehensive shipment management directly from the PrestaShop panel:Order details panel
In the details of each order with the selected parcel machine you will find:
- Information about the selected parcel machine
- InPost shipment status
- Tracking number
- Available actions
- Create a shipment - generation of a new shipment
- Download the label - PDF/EPL/ZPL label download
- Update status - status synchronization with InPost
- Track your shipment - redirection to InPost tracking page
You can set up automatic change of order statuses based on shipment status:
- Status after broadcast - when the shipment is posted
- Status after delivery - when the shipment is delivered
- Updateable statuses - which statuses can be automatically changed
8 CRON automation
The module offers a CRON system to automatically update shipment statuses:CRON configuration
- Go to module configuration
- Find the "Configure CRON tasks" section.
- Generate security key
- Copy the URL of the CRON task
- Add a task to the server schedule
*/15 * * * * curl -s "https://twojasklep.pl/index.php?fc=module&module=cc_ps_paczkomaty&controller=cron&key=TWOJ_KLUCZ" > /dev/null 2>&1- Update on shipment statuses
- Changing order statuses
- Processing of delivered orders
- Cleaning up old data
Tip
If you don't have access to CRON on the server, you can use external services like cron-job.org or run the task manually from the admin panel.
9 Administration panel
The module adds a dedicated administration panel to manage shipments:List of shipments
Accessed via: Orders > CC InPost Parcel Machines
- Overview of all InPost shipments
- Filter by status, date, customer
- Massive actions on shipments
- Downloading labels
- Tracking shipments
Each shipment includes:
- Order and customer information
- Details of the selected parcel machine
- Shipment status and history
- Detailed data from InPost's API
- Update statuses of selected shipments
- Create missing shipments
- Downloading parcel labels
10. troubleshooting
The shipment is not automatically created- Check if the customer has selected a parcel machine during the ordering process
- Verify sender data configuration
- Validate InPost API tokens
- Make sure the auto-creation function is enabled
- Check the phone number format (9 digits without prefix)
- Verify postal code (format XX-XXX)
- Make sure all required fields are filled in
- Check the correctness of the ID of the InPost organization
- Check the Geowidget token in the configuration
- Verify the display position in the settings
- Check if the customer has chosen the InPost carrier
- Clear your browser cache and check the error console
- Check shipment status (must be "confirmed" or higher)
- Verify label format settings
- Make sure that the shipment exists in the InPost system
- Check file permissions on the server
Error
If there are communication errors with the InPost API, make sure that the API parameters are up to date and that the server has HTTPS access to the Internet.
11 FAQS.
Does the module work with all versions of PrestaShop?The module is compatible with PrestaShop versions 1.7.0 to 9.x.x. It does not work with PrestaShop 1.6 and older versions.
How much does it cost to integrate with the InPost API?
Costs depend on the contract with InPost. The module uses the official InPost ShipX API, which may require fees according to InPost's price list.
Can I use the module for multiple stores?
Yes, each license allows you to use the module on one PrestaShop installation. For multiple stores you need separate licenses.
Does the module automatically update order statuses?
Yes, when you set up a CRON task, the module automatically checks shipment statuses and updates order statuses according to your settings.
What happens when a product is unavailable?
The module does not block the creation of shipments for unavailable products. It is up to the store administrator to manage product availability.
Are all InPost parcel sizes supported?
The module supports three basic sizes: small (8x38x64 cm), medium (19x38x64 cm) and large (41x38x64 cm).
Can I customize the look of the geowidget?
Geowidget uses the standard InPost style. You can customize its position on the page, but not its internal appearance.
Does the module generate invoices for shipments?
No, the module does not generate invoices. Settlements with InPost take place in accordance with the contract concluded directly with InPost.
Is it possible to create bulk shipments?
The module creates individual shipments for each order. It does not support bulk or group shipments.
Success
If you have problems with the module or questions about its operation, visit the support page at cocos.codes/support.