PrestaShop Google Merchant Feed Documentation
Comprehensive documentation for the module PrestaShop generate XML feeds for Google Merchant Center (cc_ps_google_merchant) with advanced configuration options and product filtering.Table of contents
- Introduction
- Installation and system requirements
- Module activation
- Basic feed configuration
- Advanced configuration
- XML feed structure
- Product filters
- Integration with Google Merchant Center
- Automatic refresh (CRON)
- Security and tokens
- Logging and debugging
- Image sizes
- Troubleshooting
- FAQ
1. introduction
CC Google Merchant Feed is an advanced PrestaShop module that provides full integration with Google Merchant Center. The module automatically generates an XML feed containing all products from the store in accordance with Google specifications, with advanced configuration and filtering options.Key features of the module:
- Automatic generation of XML feeds for Google Merchant Center
- Support for all required and optional Google Shopping fields
- Advanced product filtering (categories, manufacturers, quantity, promotions)
- Support for multiple languages and currencies in the store
- Additional product images (up to 10 per product)
- Automatic feed refresh by CRON
- Secure access using tokens
- Feed caching for performance optimization
- Data normalization – removing HTML, highlighting, and spaces
- URL and data format validation
- Compatible with PrestaShop 1.7.x, 8.x, and 9.x
- Full translation system (Polish, English, German, Spanish, French)
2. installation and system requirements
System requirements- PrestaShop 1.7.0.0 or newer (tested up to version 9.0)
- PHP 7.4 or later
- Access to the PrestaShop admin panel
- Google Merchant Center account (free)
- Ability to save files on the server
- Access to CRON (optional, for automatic refresh)
- Download the ZIP file of the module from the official website. cocos.codes
- Log in to your PrestaShop admin panel
- Go to: Modules → Module Manager
- Click „Upload module” in the upper right corner.
- Select the downloaded ZIP file and click „Upload this module.”
- When the installation is complete, click "Configure"
- The module is ready for configuration.
Info
After installation, the module automatically registers all necessary PrestaShop hooks and generates the first XML feed. The installation does not require any additional technical steps. The feed is saved in the directory /modules/cc_ps_google_merchant/feed.xml
3. Module activation
The module does not require separate license activation—it works immediately after installation. However, in order to start exporting products, we need to configure the basic settings.First steps after installation:
- Go to Modules → Module Manager
- Find the „CC Google Merchant Feed” module”
- Click „Configure.”
- Select the „Configuration” tab.”
- Fill in the basic feed settings
- Click „Save and Generate XML Feed.”
| Bookmark | Description |
| Configuration | Feed settings and product filters |
| Instructions | Link to feed and CRON instructions |
| Documentation | Link to full online documentation |
| Support | Link to the website COCOS support |
Tip
Before generating the feed for the first time, review the advanced settings to customize the product filters to your needs. You can select specific categories, manufacturers, minimum stock quantities, and many other options.
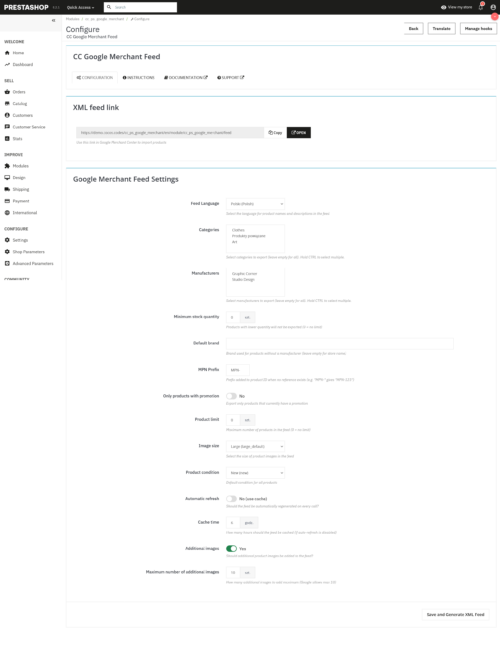
4. Basic feed configuration
The basic configuration allows you to quickly customize the feed to your needs.Basic configuration elements:
| Option | Description | Default value |
| Feed language | Language for product names and descriptions in the feed | Default store language |
| Image size | Product thumbnail size in the feed | Large (large_default) |
| Product condition | Default status for all products (new/refurbished/used) | new |
| Automatic refresh | Should the feed be regenerated with each call? | No (use cache) |
| Cache time | How many hours should the feed be cached? | 6 hours |
- In the module configuration, select „Feed language.”
- Select from the drop-down list of languages for product names and descriptions
- Click „Save and Generate XML Feed.”
- All products from the selected language are loaded from the store.
- The XML feed is automatically generated and saved.
- The file is available at the URL shown in the „Instructions” tab.”
- Google Merchant Center can immediately download the new feed.
Success
Once correctly configured, your XML feed will contain all products with the correct data. We can test it by opening the feed URL in a browser – we should see the XML structure with all products.
5. Advanced configuration
Advanced options allow you to customize the feed in detail to suit your business needs.Advanced options:
| Option | Description | Impact |
| Default brand | Brand used when the product has no assigned manufacturer | Required for products without GTIN |
| MPN prefix | Prefix added to the product ID when there is no reference | For example, MPN-123 instead of 123. |
| Product limit | Maximum number of products in the feed | Reduces feed size |
| Additional images | Should I add images other than the main photo? | Increases feed size |
| Maximum number of additional images | How many additional images to add (max 10) | Controls the amount of data |
- Enter the brand/company name you want to use for products without a manufacturer.
- If you leave this field blank, the store name from your PrestaShop settings will be used.
- Brand is required for products without GTIN
- Enter the prefix for the MPN code (e.g., „MPN-” or „SKU-„).
- The prefix will be added to the product reference number.
- If the product has a reference number, the prefix will be applied to it.
- If there are no references, the prefix will be added to the product ID.
- Product limit – default 0 (no limit). Change to a number such as 1000 if the feed is too large.
- Maximum number of additional images – default 10. Decrease to reduce the size of the feed
Note
All advanced options are optional. The module has default settings that work well for most stores.
6. XML feed structure
The XML feed generated by the module has a structure that complies with Google Merchant Center requirements.Main feed structure:
Store Name http://example.com
Product feed for Google Merchant Center 123 Product Name Product Description | Field | Description | Format | Limit |
| g:id | Unique product identifier | Text | 50 characters |
| g:title | Product name | Text without HTML | 150 characters |
| g:description | Product description | Text without HTML | 5,000 characters |
| g:link | Link to the product | URL | 2000 characters |
| g:image_link | Link to main photo | URL | 2000 characters |
| g:price | Product price | Number + currency (e.g., „99.99 PLN”) | – |
| g:availability | Availability | in stock / out of stock / preorder / backorder | – |
| g:condition | Product condition | new / refurbished / used | – |
| Field | Description | When to use |
| g:sale_price | Promotional price | When a product has a discount |
| g:gtin | EAN13 code | When the barcode is available |
| g:brand | Product brand | Almost always (required if GTIN is missing) |
| g:mpn | Manufacturer reference number | Required if GTIN and brand are missing |
| g:additional_image_link | Additional photos | For better visibility in search engines |
123 Blue T-shirt, size L High-quality cotton T-shirt in blue, size L
  http://example.com/produkt/niebieski-t-shirt http://example.com/images/tshirt-blue-large.jpg
  http://example.com/images/tshirt-blue-1.jpg 99.99 PLN 79.99 PLN
  in stock new 5901234123457 Fashion Brand MPN-123
Warning
Google requires that the feed contain all required fields. Products that do not have all the required information may not be indexed or may be removed from Google Shopping. The module automatically skips products with missing required data.
7. Product filters
Advanced filters allow you to precisely select the products that will be exported to the feed.Available filters:
| Filter | Description | Application |
| Categories | Export only products from selected categories | Leave blank for all categories |
| Manufacturers | Export only products from selected manufacturers | Leave blank for all manufacturers |
| Minimum quantity in stock | Skip products with lower stock levels | Enter a number, e.g., 5 (0 = no limit) |
| Only products on sale | Export only products that have a current promotion | Check or uncheck the option |
- In the „Categories” section, you will see a list of all categories from the store.
- Check the boxes next to the categories you want to export.
- To select multiple categories, hold down CTRL (Cmd on Mac) and click on the categories.
- Leave unchecked if you want to export all categories.
- In the „Manufacturers” section, you will see a list of all manufacturers/brands.
- Check the boxes next to the manufacturers whose products you want to export.
- To select multiple manufacturers, hold down CTRL (Cmd on Mac) and click.
- Leave unchecked if you want to export all manufacturers.
- Enter the minimum quantity of products in stock
- Products with fewer items will be omitted from the feed.
- Enter 0 to not filter by quantity (default)
- Useful for exporting only available products
- Select the „Only products with promotions” option if you want to export only promotions.
- Check this box if you want to export all products regardless of promotions.
- The module automatically adds the sale_price field for discounted products.
Tip
Combining several filters (e.g., category + manufacturer + minimum quantity) allows you to precisely tailor the feed to the needs of your marketing campaigns. For example, you can export only promotions for the most popular brands in the Clothing category.
8. Integration with Google Merchant Center
To connect the feed to Google Merchant Center, we need the feed URL and a correctly configured Google account.Getting the feed URL:
- In the PrestaShop administration panel, go to Modules → Module Manager.
- Click „Configure” next to the Google Merchant Feed CC module.
- Go to the „Instructions” tab.”
- In the „XML feed link” section, you will see the full URL for the feed.
- Click the „Copy” button to copy the URL to the clipboard.
- Log in to Google Merchant Center
- Go to the „Products” → „Channels” section.”
- Click „New Channel.”
- Select „Shopping ads” or the appropriate channel type.
- Enter the name of the channel (e.g., „PrestaShop XML Feed”).
- In the „Products” section, select „Feed URL.”
- Paste the copied URL into the feed
- Click „Next” and complete the channel setup.
- After adding the feed, Google will automatically download and validate it.
- Go to „Products” → „Diagnostics”
- Check if the feed has been successfully indexed
- If there are errors, the module will show which products have problems.
- Google Merchant Center automatically downloads the feed sometimes
- To force an immediate update, click the refresh icon next to the channel.
- Or configure automatic refresh via CRON (described below)
Success
Once the feed has been correctly configured, the products should be available on Google Shopping within a few hours. We can find them by searching for them on Google on the search results page.
9. Automatic refresh (CRON)
CRON allows for automatic feed refreshes without manual intervention.What is CRON:
- Tool for automatically performing tasks on the server
- Allows you to schedule regular activities (every 6 hours, every day, etc.)
- Perfect for refreshing your Google Merchant Center feed
- Requires access to the hosting/server panel
- In the module configuration, select the „Automatic refresh” option.”
- If you uncheck this box, the feed will be cached for a specified number of hours.
- Leave this option selected to regenerate the feed each time it is called.
0 */6 * * * curl -s "http://example.com/modules/cc_ps_google_merchant/feed.xml?token=WYGENEROWANY_TOKEN" > /dev/null 2>&1- 0 */6 * * * – runs the task every 6 hours on the hour
- curl -s – downloads URLs silently (without messages)
- http://example.com – replace with your store's address
- GENERATED_TOKEN – security token from module configuration
- /dev/null 2>&1 – hides messages and errors
| Hosting | Instructions |
| cPanel | Panel → Advanced → Cron Jobs → Add Cron Job |
| Plesk | Tools and settings → Scheduled tasks → Add task |
| Custom panel | Search for „Scheduled tasks,” „Cronjobs,” or „Cron.” |
| Linux terminal | Run: crontab -e and paste the command from the example |
0 */6 * * * wget -q -O - "http://example.com/modules/cc_ps_google_merchant/feed.xml?token=WYGENEROWANY_TOKEN" > /dev/null 2>&1- 0 * * * * – every hour
- 0 */6 * * * – every 6 hours (recommended)
- 0 0 * * * – every day at midnight
- 0 */12 * * * – every 12 hours
Note
If your hosting provider does not offer CRON access, you can also use systems such as EasyCron.com, which can run tasks for you. Simply create a task in EasyCron and paste the URL into the feed – it will run automatically.
10. Security and tokens
The module generates a security token to protect access to the feed from unauthorized access.What is a security token:
- A unique code randomly generated during module installation
- Required for each feed call by CRON
- Prevents unauthorized persons from refreshing the feed
- Changes with each regeneration
- In the PrestaShop administration panel, go to Modules → Module Manager.
- Click „Configure” next to Google Merchant Feed CC.
- Go to the „Instructions” tab.”
- In the „Automatic regeneration (CRON)” section, you will see a token.
- A token is a long string of alphanumeric characters.
http://example.com/modules/cc_ps_google_merchant/feed.xml http://example.com/modules/cc_ps_google_merchant/feed.xml?token=abc123def456ghi789jkl- In the „Instructions” tab, click the „Generate new security token” button.”
- A confirmation window will appear – click OK.
- A new token will be generated and displayed.
- The old token will stop working immediately.
- If you are using CRON, you must update the command with the old token.
Warning
Remember to keep your token in a safe place. Do not share it publicly or enter it into unsecured sources. If you suspect that your token has been compromised, generate a new one immediately.
11. Logging and debugging
Sometimes it may be necessary to check whether the feed is generated correctly.Testing the feed manually:
- Open the feed URL in your web browser.
- You should see the raw XML code with products.
- Right-click and select „View page source.”
- Check if the XML structure is correct
- Check that all required fields are present for each product.
- Go to XML Validator
- Copy the feed content and paste it into the validator.
- The validator will show whether the XML has the correct syntax.
- If there are errors, note the line number where the problem is.
- Go to Google Merchant Center
- Open the feed channel
- Go to „Diagnostics”
- Check „Errors” and „Warnings.”
- Google will show which products have problems and what is wrong with them.
- If the feed is not generating, check the PHP error logs on the server.
- Search for errors related to the cc_ps_google_merchant module
- Check if the server has write permissions in the module directory.
- Check if PHP has the SimpleXML extension installed.
Error
If the feed is not generated or an error message appears, please contact COCOS support at cocos.codes/support providing information about the error from the server logs.
12. Image sizes
The module supports various sizes of product thumbnails that we can choose for the feed.Available image sizes:
| Size | Typical dimensions | Application | Recommendation |
| Small (small_default) | ~98×98 px | Thumbnails in product lists | Not for Google Shopping |
| Medium (medium_default) | ~250×250 px | Catalog photos | Possible |
| Large (large_default) | ~500×500 px | Full product photos | Recommended |
| Very large (thickbox_default) | ~1000×1000 px | Product zoom | Best for Google |
- In the module configuration, go to „Image size.”
- Select your preferred size from the drop-down list.
- Click „Save and Generate XML Feed.”
- Minimum size: 100 x 100 pixels
- Recommended size: 800 x 800 pixels or larger
- Maximum file size: no limit, but Google only downloads the first 10MB
- Formats: JPG, PNG, GIF, BMP, TIFF, ICO, CUR, SVG, WEBP
- The module can add up to 10 additional photos to each product.
- Increases the chances that the product will appear in Google Images search results
- You can disable this option to reduce the size of the feed.
- The „Maximum number of additional images” option allows you to control the number of
Tip
For best results in Google Shopping, we recommend selecting „Very large (thickbox_default)”. Larger images make products look better in search results and can increase clicks.
13 Troubleshooting
The feed is not being generated.- Check if the module is active in the Module Manager.
- Check whether the server has write permissions in the directory. /modules/cc_ps_google_merchant/
- Log in to the admin panel and try clicking „Save and Generate XML Feed.”
- Check the server error logs (PHP error.log).
- Ensure that PHP has the SimpleXML extension installed.
- Try turning the module off and on again.
- Check if the products are active in PrestaShop
- Check if the products have a category assigned to them.
- If you are using filters, check whether the products meet the filter conditions.
- Check the minimum quantity in stock – out-of-stock products may be omitted.
- Open the XML feed in your browser and search for products manually (CTRL+F).
- Go to Google Merchant Center and open the „Diagnostics” tab.”
- Read the detailed error message
- Check which fields are missing – Google requires specific fields
- The module automatically skips products with missing required data.
- Ensure that products have: title, description, link, photo, price, availability, GTIN, or brand.
- Check if the price in PrestaShop is set correctly.
- Check if the store currency is configured correctly.
- If there are discounts, the module should select the discounted price.
- Check that VAT is applied correctly (the price should include VAT).
- Check if the „Additional images” option is enabled in the configuration.
- Ensure that products have additional images assigned in PrestaShop.
- Check that the maximum number of additional images is not set to 0.
- Open the XML feed and check if there are any g:additional_image_link elements.
- Check if the CRON task is correctly added in the hosting panel.
- Check that the URL in the CRON command is correct.
- Check if the token in the URL is current (it sometimes changes with updates).
- Try manually entering the URL in your browser to see if it works.
- Check the CRON logs in the hosting panel – they may contain information about errors.
Info
Most problems are caused by missing product data (e.g., title, description, photo) or incorrect feed configuration. Please check that all products have complete data before reporting a problem.
14 FAQS.
Is the module compatible with PrestaShop 9.0?Yes, the module has been tested and is fully compatible with PrestaShop 1.7.x, 8.x, and the latest version 9.0.
Do I need to have a Google Merchant Center account to use the module?
Yes, Google Merchant Center is free, but it requires a Google account and store configuration. The module generates a feed, but you need an active Merchant Center account to display products on Google Shopping.
How long does it take to generate a feed?
It depends on the number of products and server performance. For a store with 1,000 products, it usually takes a few seconds. For large stores, we can reduce the size by reducing the number of additional images.
Can I export products from specific categories only?
Yes, the module allows you to select specific categories for export. You can select multiple categories by holding down the CTRL key while clicking.
Does the module support multiple languages?
Yes, when generating the feed, we can select the language for product names and descriptions. The feed will contain data in the selected language from the store.
What happens when I change the module settings?
After saving the settings, the module automatically regenerates the XML feed. The new feed contains the changed settings (e.g., different image size, added filters, etc.).
Can I disable additional images to reduce the size of the feed?
Yes, in the „Additional images” section, you can disable the option or reduce the maximum number of additional images (10 by default).
How are the promotional products doing?
If the product is on sale, the module automatically adds the g:sale_price field containing the discounted price, and g:price contains the price before the discount.
What happens if he adds a new product to the store?
The new product will appear in the feed the next time it is refreshed (either manually or by CRON). If CRON runs every 6 hours, the product will appear after a maximum of 6 hours.
Can I have multiple feed instances (for different channels)?
The module generates one main feed, but we can filter it (categories, manufacturers) to create virtually different versions of the feed through custom configuration for each channel in Google Merchant Center.
Can I modify the XML feed structure?
The XML structure is defined by Google's specification and is immutable. The module generates a 100% feed that complies with Google's requirements and does not allow the structure to be changed.
What happens when you uninstall the module?
The module removes all its settings from the database. The feed.xml file remains in the directory but is no longer updated. You can delete it manually.
Is there a limit to the number of products in the feed?
The technical limit is the total size of the XML file (no direct limit), but we can set a limit on the number of products in the configuration (the „Product limit” field).
How can I check if the feed is working correctly?
Open the feed URL in your browser—you should see XML code. Go to Google Merchant Center and check the „Diagnostics” tab in the channel configuration—Google will show you if the feed has been downloaded correctly and if there are any errors.