WordPress Customer Reservation System Documentation
Comprehensive documentation for the advanced reservation system plugin WordPress (cc_wp_customer_reservation) with calendar, statistics, customer management and integration with popular calendar libraries.Table of contents
- Introduction
- Installation and system requirements
- License activation
- Management panel
- Customer management
- Service management
- Reservation system
- Booking Calendar
- Time blocking
- Tipping system
- Statistics and reports
- Importing customers from CSV
- Booking form on the front
- Personalizing the look
- Email notifications
- Advanced settings
- Troubleshooting
- FAQ
1. introduction
CC WordPress Customer Reservation is a comprehensive reservation management system for WordPress, designed for hair salons, beauty salons, medical centers and any service business requiring scheduling of customer visits. The plugin offers an intuitive interface, advanced statistics and full automation of the booking process.Key features of the plugin:
- Advanced booking calendar with FullCalendar 6.1 integration
- Comprehensive customer management with visit history
- Service system with prices, discounts and duration
- Blocking of time slots (vacations, breaks)
- Tipping system for each booking
- Detailed financial statistics and reports
- Importing customers from CSV files
- Customer booking form on the front of the site
- Public calendar with busy dates
- Automatic email notifications
- Custom interface colors
- Multi-currency and flexible settings
- License management system
2. installation and system requirements
System requirements- WordPress 5.0 or later
- PHP 7.4 or later
- MySQL database 5.6 or later
- Permission to create Custom Post Types
- Ability to send emails through WordPress (optional)
- Download the ZIP file of the plugin from the official site cocos.codes
- Log in to your WordPress admin panel
- Go to: Plugins → Add New → Upload plugin to server
- Select the downloaded ZIP file and click "Install Now".
- Once the installation is complete, click "Activate Plugin"
- The plugin will automatically register Custom Post Types (bookings, customers, services)
- A new "Reservations" menu will be created in the WordPress dashboard
- Go to Reservations → Settings to configure the plugin
Info
After installation, the plugin will automatically create three Custom Post Types: cc_client (customers), cc_service (services) and cc_reservation (Reservations). You can optionally enable the automatic addition of demo data in the settings.
3. license activation
It is necessary to activate the license before using the full functionality of the plug-in:- After installation, go to Reservations → Settings
- Select the "License" tab
- Enter the license key you received after purchase
- Click "Activate License"
- After successful activation, you will see a confirmation message
- All features of the plug-in will be unlocked
Warning
Without an active license, the plugin will work in demo mode. The admin panel will display messages about an inactive license, and most saving functions will be disabled. Custom Post Types registration also requires an active license.
4. management panel
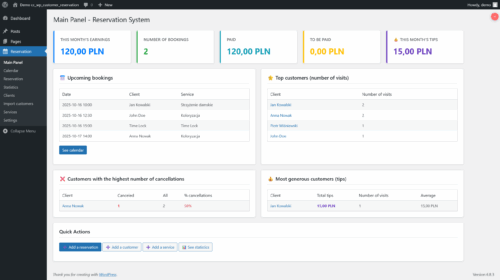
The plugin's management panel is available in the WordPress main menu under the name "Reservations" and consists of the following sections:Main menu tabs:
- Main panel - overview of key statistics and upcoming bookings
- Calendar - interactive calendar of all bookings and time blocks
- Reservations - list of all bookings with filtering and editing capabilities
- Customers - management of customer base with history of visits
- Services - catalog of services with prices and discounts
- Statistics - detailed financial reports and analysis
- Importing customers - bulk import of customer data from CSV files
- Settings - configuration of all plug-in functions
- Settings - Configuration of operating hours, currencies, colors and notifications
- Documentation - link to full online manual
- License - plug-in license management
- Plugins - information on other COCOS products
- Support - access to technical support
Tip
The plugin's menu is automatically organized for better ergonomics. The most frequently used functions (Main Panel, Calendar, Reservations) are at the beginning, and settings are at the end.
5. customer management
The customer management system allows you to comprehensively maintain a customer database with a full history of visits.Data stored about the customer:
- Name - The full name of the customer (displayed as the title of the entry)
- Phone number - telephone contact (used to detect duplicates)
- Email address - used for notifications (optional)
- Notes - additional information about the customer (preferences, allergies, comments)
- History of visits - automatically generated list of all bookings
- Go to Reservations → Customers → Add a customer
- Enter your name in the title field
- Fill in your contact information (phone is required)
- Add notes if needed
- Click "Publish"
| Column | Description |
| Name | Customer name with link to edit |
| Phone | Contact number |
| Customer email address | |
| Number of visits | Automatically counted number of bookings |
| Date | Date the customer was added to the system |
- When editing a customer, a table of all his bookings is displayed
- Information about the date, time, service and status of each visit
- Indication of whether the visit has been paid
- Direct link to edit each reservation
Success
The system automatically detects duplicate customers based on the phone number when adding new reservations. If a customer with a particular number already exists, it will be automatically assigned to the reservation.
6. service management
The service catalog forms the basis of the reservation system, defining the available services along with their financial and time parameters.Service parameters:
- Name of the service - displayed on forms and invoices
- Description - detailed description of the service (optional)
- Duration - In minutes (e.g., 30, 45, 60, 90, 120)
- Price - the basic price of the service in the selected currency
- Type of discount - percent (%) or a fixed amount
- Discount value - the size of the discount according to the type
| Type | Description | Example |
| No discount | Full price of the service | 100 PLN (without discount) |
| Percentage (%) | Percentage discount on price | 100 PLN - 10% = 90 PLN |
| Fixed amount | Discount in a certain amount | 100 PLN - 15 PLN = 85 PLN |
- Go to Reservations → Services → Add a service
- Enter the name of the service in the title field
- Optionally add a description in the content editor
- Fill in the details of the service: duration and price
- Set discount if offered
- Click "Publish"
- Name of the service - name with link to edit
- Duration - displayed in minutes (e.g., "45 min")
- Price - Formatted price with currency (e.g., "80.00 PLN")
- Discount - type and value of discount or "-" if none
- Date - date of service addition
Note
The discount is automatically included in all statistics and reports calculations. The final price of the reservation is the price of the service after the discount plus an optional tip. The discount cannot result in a negative final price.
7. reservation system
Reservations are the core of the system, connecting customers to services on specific dates.Booking details:
- Customer - selection from the customer base (with AJAX search engine)
- Service - selection from the catalog of services
- Date - booking day
- Start time - service start time
- Status - scheduled / completed / cancelled
- Paid - whether the visit has been paid
- Tip - additional amount from the customer (optional)
- Notes - additional booking information
| Status | Color | Meaning |
| Scheduled | Blue (#007bff) | Booking confirmed, pending |
| Completed | Green (#28a745) | The visit took place, included in the statistics |
| Cancelled | Red (#dc3545) | Booking cancelled, omitted from statistics |
- Go to Reservations → Bookings → Add a reservation
- Search and select a customer (enter first name, last name or phone)
- Select a service from the drop-down list
- Set the date and time of the reservation
- Select the status (default "Scheduled")
- Optionally add a tip and notes
- Click "Publish"
- Change of status - click on the drop-down menu in the "Status" column
- Marking payments - click the checkmark icon in the "Paid" column
- Changes are saved automatically by AJAX
- Spinner is displayed while saving
- Title - automatically generated: "Reservation - [Customer] - [Service]".
- Customer - Name with link to customer card
- Service - name of service with link to edit
- Date of visit - date and time in the format from the settings
- Status - drop-down menu for quick changes
- Paid - YES/NO icon with quick change option
Warning
The system does not block the creation of overlapping bookings. We recommend using the calendar to schedule appointments, which visually shows busy appointments. For extra protection, you can enable availability validation in the frontend settings.
8 Booking Calendar
The interactive calendar uses the FullCalendar 6.1 library to visualize all reservations and time blocks.Calendar features:
- Different views - month, week, 3 days, single day
- Coloring events - by reservation status
- Click to book - forward to editing
- Click on the date - create a new reservation with a predefined date
- The "now" indicator - red line showing the current time
- Responsiveness - automatic adaptation to mobile devices
- Location - automatic translation into WordPress language
| View | Application | Detail |
| Month | Long-term review | Just the date and title |
| Week | Weekly planning | Hours and details |
| 3 days | Current period | Detailed hours |
| Day | Daily planning | Full details of visits |
- Blue - scheduled bookings (#007bff)
- Green - bookings completed (#28a745)
- Red - cancellations (#dc3545)
- Gray - time locks (#6c757d)
- Go to Reservations → Calendar
- Select your preferred view (month/week/day)
- Use "previous/next" buttons to navigate
- Click "Today" to return to the current date
- Click on a reservation to edit it
- Click on a free date to add a new reservation
- Calendar automatically adjusts to work hours from settings
- By default, it displays the range from start time to end time
- The "all day" slot is off
- All hours displayed in 24-hour format (HH:mm)
Tip
On mobile devices (screens <768px), the calendar automatically switches to daily view for better readability. The toolbar is also simplified on small screens.
9. time blocking
The time-blocking system allows booking time slots without assigning client and service - ideal for urlóps, interruptions and unavailability.What is time blocking:
- A special type of reservation labeled "Time Lock"
- No customer or service selection required
- Requires a start and end time
- Displayed on the calendar in gray with the icon 🚫
- Not included in financial statistics
- Prevents normal bookings from being created during blocked time
- Go to Reservations → Bookings → Add a reservation
- Check the "🚫 Time lock" checkbox at the top of the form
- Customer and Service fields will be automatically hidden
- Set the lock date
- Specify start time (required)
- Specify the time of termination (required for interlocks)
- Optionally add a title and notes (e.g., "Vacation", "Technical break")
- Click "Publish"
| Element | Booking | Time lock |
| Customer | Required | None (hidden) |
| Service | Required | None (hidden) |
| The hour of the end | Calculated automatically | Required manually |
| Payment | Yes (hidden) | None (hidden) |
| Tip | Optional | None (hidden) |
| Statistics | Considered | Overlooked |
- In the booking list - The "Customer" column displays "🚫 Time lock".
- In the calendar - gray box with the text "🚫 Time lock" + optional title
- On the front - displayed as "Busy" (without details)
- Time range - shown as "date HH:mm - HH:mm"
Info
The "Time lock" checkbox automatically shows/hides the relevant form fields using JavaScript. When the lock is checked, the customer, service, payment and tip fields become un-required and hidden. The end time field becomes visible and required.
10. tipping system
An advanced tipping system makes it possible to record additional contributions from customers and analyze customers' generosity in detail.Tipping system functions:
- Tip field in each booking (optional)
- Automatically add to the final price of the reservation
- Separate tip statistics in the dashboard
- Ranking of the most generous customers
- Include in financial reports
- Tracking the average tip per customer
- Open the reservation for editing
- Find the "Tip (PLN):" field in the payment section
- Enter the amount of the tip (e.g. 10.00)
- The tip will automatically be added to the final price
- Save your reservation
Final price = (Price of service - Discount) + Tip.
Example:
Service: 100 PLN
Discount 10%: -10 PLN
Tip: 15 PLN
Final price: 105 PLN.- Dashboard - tile with the total tips in the current month
- Most generous customers - ranking with total and average tips
- Statistics - detailed tip reports by period
- Earnings - tips included in revenue reports
| Customer | Total tips | Number of visits | Average |
| Jan Kowalski | 150,00 PLN | 10 | 15,00 PLN |
| Anna Nowak | 120,00 PLN | 8 | 15,00 PLN |
Success
A tipping system helps identify the most satisfied and generous customers. The tip average is a great indicator of service quality. You can reward the most generous customers with additional discounts or benefits.
11 Statistics and reports
A comprehensive statistics system offers detailed financial reports, customer analysis and revenue forecasts.Main panel - key metrics:
- This month's earnings - total revenue from completed visits
- Number of bookings - all bookings in the current month
- Paid - total paid reservations
- To be paid - sum of unpaid reservations
- Tips this month - separate tip amount
- Filtering form - selection of date range for analysis
- Comparison with the previous period - percentage change in earnings and bookings
- Cancellation rate - percentage of cancellations
- Revenue forecast - expected revenue from scheduled visits
- Filling today - percentage of occupied time slots
- Average time between visits - analysis of customer return frequency
- Earnings visualization for each month in the current year
- Division into paid (green) and to be paid (yellow)
- Interactive bar chart with values
- Abbreviated month names for better readability
- Chart of popularity of each hour of the day (0-23)
- Identification of peaks and lows of occupancy
- Help optimize working hours
- Visualization as a bar chart
- Earnings comparison for each day (Mon-Sat)
- Number of reservations for each day
- Identifying the best and worst days
- Help with scheduling
| Category | Criterion | Displayed data |
| Top customers (visits) | Number of bookings | Name, number of visits |
| Top customers (expenses) | Total money spent | Name, total, visits, average |
| The most generous (tips) | Total tips | Name, total tips, average |
- Customer ranking by number of cancellations
- Percentage of cancellations relative to all bookings
- Coloring: >30% red, others gray
- Help identify problematic customers
- Top 10 services by number of bookings
- Unit price of each service
- Link to edit service
- Numbering from 1 to 10
- Ranking of services by total revenue
- Number of performances of each service
- Unit price and total revenue
- Help identify the most profitable services
- 5 upcoming scheduled visits
- Date, customer and service
- Chronological sorting
- Link to edit each reservation
- Total amount lost on discounts
- Number of discounts given
- Analysis of the effectiveness of the discount program
- Export button at the top of the statistics page
- Generate a CSV file with all bookings from the selected period
- Columns: Date, Time, Customer, Service, Price, Discount, Tip, Final price, Status, Paid.
- UTF-8 encoding with BOM for Polish characters
- Filename: statistics-reservations-[date].csv
Tip
Regularly review statistics to identify trends in your business. Pay particular attention to the cancellation rate (should be <10%), fill rate (optimal 60-80%), and worst days of the week (possibility of changing business hours).
12. import of customers from CSV
The bulk import function allows you to quickly add a large number of customers from a CSV file, saving time when migrating from other systems.CSV file format:
- Separator - comma (,)
- Coding - UTF-8
- First line - column headers (will be omitted)
- Maximum size - 2MB
- Name - required
- Name - required
- Phone - required (used to detect duplicates)
- Email - optional
- Notes - optional
First Name,Last Name,Phone,Email,Notes
Jan,Kowalski,+48500100200,[email protected],Stały customer
Anna,Nowak,+48600200300,[email protected],Preferuje afternoons
Piotr,Wiśniewski,+48700300400,,- Go to Reservations → Customer Imports
- Read the instructions and requirements
- Prepare the CSV file according to the format
- Click "Select CSV file" and select the file
- Click "🚀 Import customers."
- Wait for the import to complete
- Read the results report
- Checking the file type - only text/csv and text/plain
- Data validation - required fields must not be blank
- Duplicate detection - based on phone number
- Data sanitization - cleaning all entered values
- Imported - number of successfully added customers
- Omitted - number of rejected records
- Error details - maximum first 10 errors
- Reasons for omission - missing data, duplicate, record error
Success
Imported: 45 customers. Omitted: 3.
Details:
- Client Jan Kowalski already exists (tel: +48500100200)
- Omitted line: no data required (Maria )
- Client Anna Nowak already exists (tel: +48600200300)
Details:
- Client Jan Kowalski already exists (tel: +48500100200)
- Omitted line: no data required (Maria )
- Client Anna Nowak already exists (tel: +48600200300)
- Back up your database before major imports
- Test import on a small sample of data (5-10 records)
- Make sure phone numbers are in a uniform format
- Check the file encoding (should be UTF-8)
- Remove empty rows from a CSV file
- Large imports (>100 records) can take several minutes
Warning
The import automatically skips duplicates based on the phone number. If a customer with a given number already exists in the system, the new record will be skipped. It is not possible to update existing customers by import - only to add new ones.
13. booking form on the front
The system offers ready-made shortcodes to place the booking form and calendar on any WordPress page.Available shortcodes:
| Shortcode | Function | Parameters |
| [cc_reservation_form] | Booking form | title="Custom Title" |
| [cc_reservation_calendar] | Calendar with busy dates | title="Custom Title" |
- Name - required, text
- Name - required, text
- Phone number - required, tel field with placeholder
- Email - optional, email validation
- Select a service - required, drop-down list with prices
- Date of visit - required, date field (min: today)
- Time of visit - required, select with working hours
- Nonce WordPress - CSRF protection
- Server-side validation - check of all fields
- Checking availability - whether the date is not already taken
- Interval validation - whether the time matches the set intervals
- Detection of overlapping bookings - taking into account the duration of services
- Create a new WordPress site (Sites → Add New)
- Name it, for example, "Online booking".
- In the editor, paste the shortcode: [cc_reservation_form]
- Optionally change the title: [cc_reservation_form title="Make an appointment"].
- Publish page
- Copy the link and add it to your site menu
- The customer fills out the form
- After clicking "Book an appointment", validation takes place
- The system checks if the customer already exists (by phone number)
- If not - it automatically creates a new customer
- The availability of the selected date is checked
- A new reservation is created with the status "Scheduled"
- Email notifications are sent (if enabled)
- Customer sees confirmation message
- Success - "The reservation has been accepted! Confirmation has been sent to your email."
- Date taken - "This date is already taken. Please select another date."
- Data error - "Fill in all required fields."
- Recording error - "Failed to save the reservation. Try again."
- Displays all busy appointments as "Busy"
- Does not show booking details (privacy)
- Cancelled visits are hidden
- Automatic localization (WordPress language)
- Responsive design
- Views: month, week, day
Info
The online booking function must be enabled in the settings (Settings → Online Booking → "Enable booking through the form on the site"). Otherwise, the shortcode will display a message about the disabled function.
14. appearance personalization
The system offers advanced personalization of interface colors for a perfect match with the company's corporate identity.Personalization elements:
- Leading color - main color used in the interface
- Predefined palettes - 8 ready-made color schemes
- Live view - immediate visualization of changes
- Automatic shades - system generates hover color (-30 brightness)
| Name | Color HEX | Application |
| Blue (default) | #007bff | Universal, professional |
| Green | #28a745 | Ecology, health |
| Turquoise | #17a2b8 | Modern, fresh |
| Purple | #6f42c1 | Luxury, creative |
| Pink | #e83e8c | Feminine, delicate |
| Orange | #fd7e14 | Energetic, warm |
| Red | #dc3545 | Bold, distinctive |
| Dark grey | #343a40 | Elegant, subdued |
- Booking form - buttons, headers, input focus
- Calendar - navigation buttons, today's date, time indicator
- Buttons - background, hover, active, focus
- Inputs - border at focus, left edge of required fields
- Headlines - bottom edge (border-bottom)
- Go to Reservations → Settings
- Find the "Frontend Appearance" section
- Click in the color box or select from the palette
- Use "Quick Color Selection" buttons for predefined palettes
- Check the live preview (sample button, header, input)
- Save your settings
- Example button - background in leading color, hover darker
- Sample headline - bottom edge in the leading color
- Input field - focus frame in leading color
- Interactivity - hover on button, focus on input
// Function adjust_color_brightness in Plugin.php
public static function adjust_color_brightness($hex, $steps) {
    // Conversion of HEX to RGB
    // Adding/subtracting $steps to each component
    // Conversion back to HEX
    // Returning darker/brighter color
}- Styles automatically adapt to user preferences
- Using media query: @media (prefers-color-scheme: dark)
- Guide color works in both light and dark mode
Tip
Choose a lead color that matches your brand and test the live preview before saving. Remember about contrast - dark colors (dark gray, purple) may be less readable on a dark background. Bright colors (orange, pink) work great on a light background.
15. email notifications
An automatic notification system informs clients and administrators of new bookings and their status.Types of notifications:
- Confirmation for the customer - email after successful booking from the front
- Notice to admin - new reservation information
- Automatic sending - for front-end bookings only
- Manual bookings - without automatic notifications
Subject: booking confirmation - [Site name].
Hi [Customer Name]!
Your reservation has been confirmed.
Details:

Service: [Service Name].
Date: [Date of booking].
Time: [Time].

See you there!
[Site Name]Subject: new booking - [Customer name].
[Same content as for the customer].- Go to Reservations → Settings
- Find the "Notifications" section
- Check "Send email notifications about bookings"
- Enter admin email (default: admin_email WordPress)
- Save your settings
- WordPress must have the feature configured wp_mail()
- The server must be able to send emails
- The customer must provide a valid email address in the form
- For more reliable deliverability, we recommend an SMTP plug-in (such as WP Mail SMTP).
| Action | Email to customer | Email to admin |
| Booking from the front | ✓ Yes | ✓ Yes |
| Booking from the panel | ✗ No | ✗ No |
| Editing a reservation | ✗ No | ✗ No |
| Cancellation | ✗ No | ✗ No |
- Email doesn't arrive - check spam, configure SMTP
- Wrong sender - WordPress uses [email protected]
- No customer email - email field is optional, make sure you fill it in
- Function disabled - check the checkbox in the notification settings
Warning
The SMS notification function listed in the settings is currently under development and does not work. Checking this checkbox has no effect. We plan to add integration with popular SMS gateways in future versions.
16. advanced settings
The general settings section offers detailed configuration of all aspects of the reservation system.Basic Settings:
- Currency - PLN, EUR, USD, GBP
- Currency position - before the amount or after the amount
- Date format - e.g. d.m.Y (31.12.2025), Y-m-d (2025-12-31)
- Time format - H:i (24h) or h:i A (12h with AM/PM)
- Start time - Start of the working day (default 08:00)
- Closing time - The end of the working day (default 18:00)
- Booking interval - Every how many minutes reservations are possible (e.g. 15, 30, 45, 60)
| Interval | Hours available | Application |
| 15 minutes | 8:00 a.m., 8:15 a.m., 8:30 a.m., 8:45 a.m.… | Quick services |
| 30 minutes | 8:00 a.m., 8:30 a.m., 9:00 a.m., 9:30 a.m.… | Standard for most companies |
| 60 minutes | 8:00 a.m., 9:00 a.m., 10:00 a.m., 11:00 a.m.… | Long consultations |
- Leading color - the main color of the interface (see Chapter 14 for details)
- Predefined palettes - 8 ready-made color schemes
- Live view - interactive visualization of changes
- Reservations from the front - enable/disable form on page
- Calendar view - month / week / day
- Email notifications - automatic emails after booking
- Administrator's email - address for notifications (by default admin_email WP)
- SMS notifications - function in preparation (inactive)
- Enable adding sample data - automatic data on activation
- 3 sample customers
- 4 sample services
- 5 sample bookings (future and historical)
- Displayed table with all shortcodes in settings
- Description of each shortcode and its parameters
- Examples of use
- "Copy" button to clipboard for each shortcode
// The settings are processed by:
admin_post_cc_wp_cr_save_settings
// And saved in WordPress options:
cc_wp_cr_options (an array of all settings)
// Access to settings in code:
$plugin->get_option('currency'); // single option.
$plugin->get_all_options(); // all options
Note
After changing the booking interval, we recommend reviewing existing bookings. Some times may not match the new interval (e.g., 08:20 with an interval of 30min). The frontend system automatically validates the compatibility with the interval.
17 Troubleshooting
Plugin does not save settings- Check if you have an active license (Settings → License)
- Make sure you are logged in as administrator
- Check database write permissions
- Disable WordPress cache and cache plugins
- Check PHP error logs (WP_DEBUG = true)
- Make sure the nonce passes validation
- Check if there are any bookings in the system
- Make sure your reservations have the date and time set
- Check your browser console for JavaScript errors
- Verify that FullCalendar has loaded (check page sources)
- Clear browser cache and cache plugins
- Check if AJAX endpoint is working (admin-ajax.php)
- Make sure the feature is enabled in the settings
- Check that the shortcode is pasted correctly
- Verify JavaScript errors in the browser console
- Make sure the reservation-form-frontend.js script has loaded
- Check that the nonce is generated correctly
- Disable other plugins for conflict detection
- Check if the feature is enabled in the settings
- Make sure the customer has entered an email in the form
- Check your spam folder
- Verify wp_mail() configuration (test mailing)
- Install an SMTP plugin (such as WP Mail SMTP).
- Check the mail server logs
- Check file format (separator: comma, encoding: UTF-8)
- Make sure the first line is the headers
- Verify that all required columns are filled in
- Check the correctness of phone numbers
- Remove empty lines from the file
- Test on a small sample (5-10 records)
- Check that the bookings have the correct status ("Completed" for statistics)
- Make sure the services have assigned prices
- Verify booking dates (whether they match the filtered period)
- Check that discounts are calculated correctly
- Rebuild statistics cache (disable/enable plugin)
- Make sure the "Time lock" checkbox is checked
- Check that the end time is given
- Verify that the hours do not overlap with other bookings
- Check that JavaScript that supports hiding fields is working
- Clear browser cache
- Make sure you click "Save Settings"
- Clear WordPress cache and cache plugins
- Clear browser cache (Ctrl+F5 or Cmd+Shift+R)
- Check that inline styles are generated in the source code
- Verify that you are using the latest version of the plugin
Error
If problems persist, enable WordPress debugging (WP_DEBUG = true in wp-config.php) and check the error logs. In case of license issues or critical errors, contact COCOS support via cocos.codes/support.
18 FAQS.
Can I use the plugin on multiple sites?The license is assigned to a single domain. Separate licenses or a multi-site license must be purchased for multiple sites.
Is the plugin compatible with WooCommerce?
Yes, the plugin works independently of WooCommerce and does not cause conflicts. You can use both systems at the same time.
Can I customize the look of the booking form?
Yes, by selecting the theme color in the settings. For advanced modifications, you can use custom CSS in the theme.
How often are email notifications sent?
Notifications are sent as soon as a booking is created from the frontend form. Reservations from the panel do not trigger notifications.
Can I export my reservation data?
Yes, in the Statistics tab there is a button "📥 Export to CSV" which generates a CSV file with all bookings from the selected period.
What data is stored about customers?
Name, phone, email (optional), notes and history of all bookings. The data is stored in a WordPress database.
Does the system support multiple employees?
Currently, the plugin does not have built-in support for multiple workers. We are planning this feature in future versions.
Can I limit bookings to certain days of the week?
There is currently no such function in the settings. This can be achieved by blocking entire days with time blocks.
What happens when uninstalling the plug-in?
The system automatically deletes all Custom Post Types (bookings, customers, services), setting options and CRON tasks. The data is permanently deleted.
Does the plug-in support different time zones?
The plugin uses the WordPress time zone. Set the correct zone in Settings → General → Time zone.
How can I translate the plugin into another language?
The plugin uses standard WordPress translation features. You can use Loco Translate or Poedit to create your own translations.
Does the system check for overlapping bookings?
Yes, when booking from the front, the system checks whether the selected date does not conflict with existing bookings (taking into account the duration of services).
How does the tipping system work?
The tip can be added manually to each booking in the administration panel. It is automatically added to the final price and included in the statistics.
Can I integrate the plugin with Google Calendar?
Currently, the plugin has no integration with Google Calendar. You can export data to CSV and import to Google Calendar manually.